


In this series, we are going to get you to the edge of building your own cloud-based, cross-platform augmented reality app for iPhone, Android, HoloLens, and Meta 2, among other devices. Once we get the necessary software installed, we will walk through the process of setting up an Azure account and creating blob storage.
Why Cloud-Based Apps Are Where It's At
In recent years, "the cloud" has become much more than an overly used buzzword and marketing term to help sell software as a service. Amazon Web Services, Google Cloud, and Microsoft Azure have all flourished and become a part of our everyday lives, whether we realize it or not. With the augmented reality market coming into clearer focus, these cloud services will become an even greater necessity.
With the constant need to maximize hardware and keep the form factor of the various device iterations as minimal as possible, developers will be forced to rely on cloud services to a greater extent. A significant reliance on artificial intelligence features such as computer vision and voice recognition will further this dependency. In other words, prepare now for a lot of time working with the cloud.
The Easiest Way to Learn Cloud Development
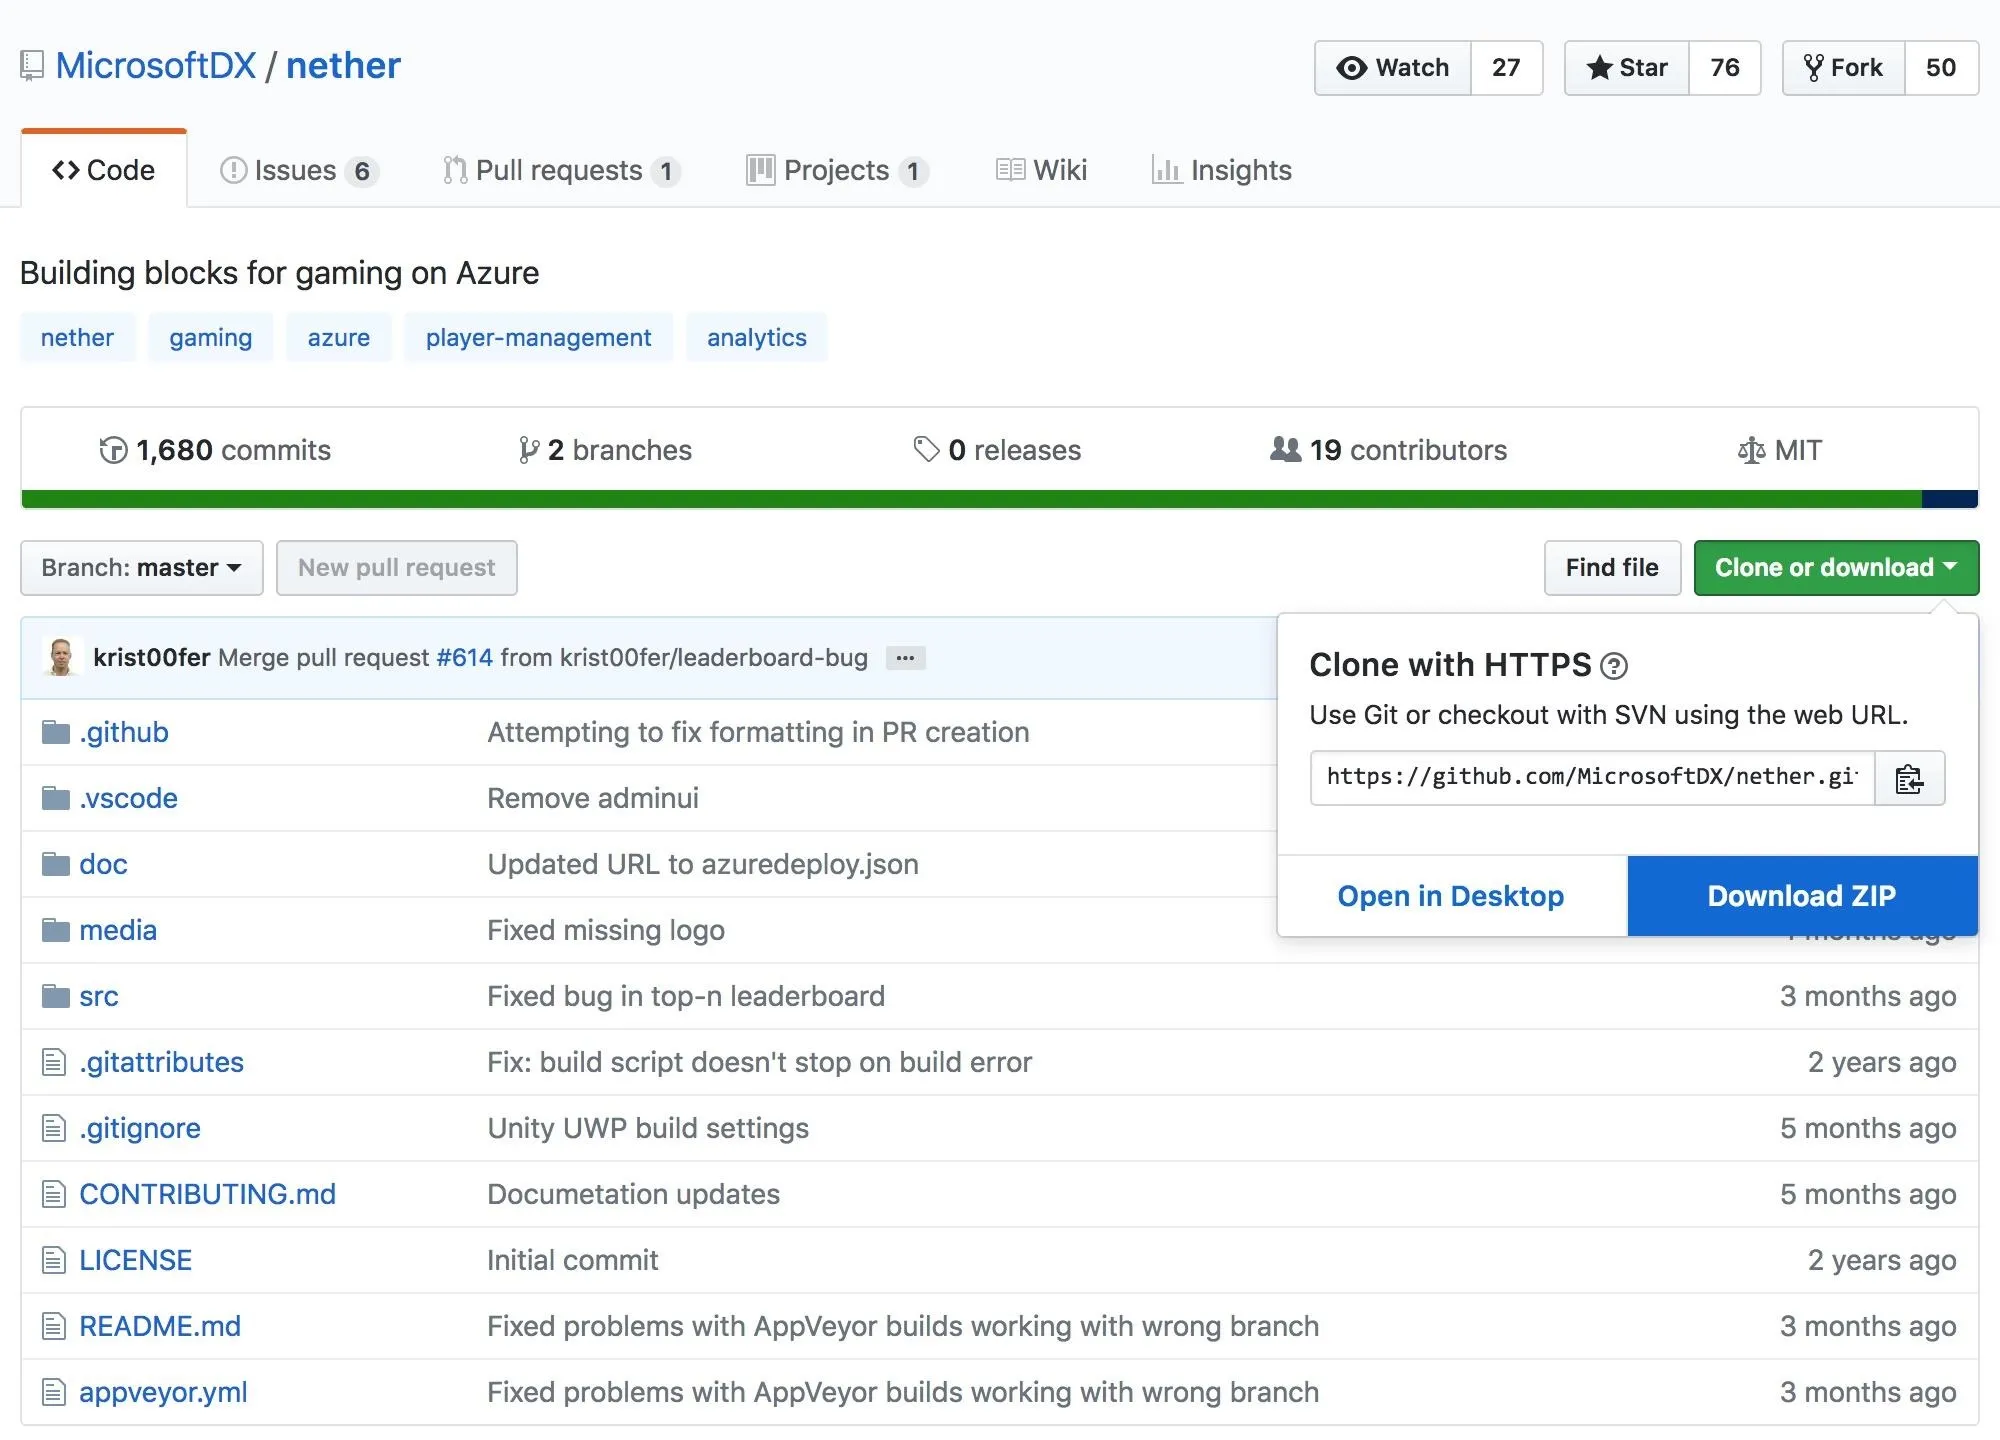
For many of the indie and bootstrapping developers coming to AR from gaming or non-IT backgrounds, cloud development can be both a bit scary and a downright mess. In an effort to minimize the potential trauma and lighten the learning curve, Microsoft has put together a GitHub repository called Project Nether for those curious about utilizing cloud services.
Aimed at gaming, Project Nether is a collection of reusable building blocks for getting one's feet wet in cloud development. Through solutions to common problems, sample code, and a set of best practices, this collection should serve as a shortcut for any developer trying to get going with a cloud-computing service — including scenarios involving AR games or non-gaming applications.
Project Nether offers support for Unity, JavaScript, iOS, and Android, making it a great solution for those who truly want to support multiple platforms. Some of the features offered by Project Nether include leaderboards, identity, player management, as well as daily, monthly, and yearly analytics.
A Few Quick Notes Before Getting Started
As this is a setup guide not aimed at a specific hardware platform, this guide will work on both Mac and Windows computers. We'll be going over everything from the Windows side of things, so if you have a Mac-related question, feel free to hit us up in the comments and we'll try to get you squared away.
Also, this project requires a Microsoft Azure account which, while free to use for the initial $200 in credit and 30 days, does require a credit card and phone to verify identification. The $200 credit allows you, as a developer, to understand the Azure pricing system by spending that credit as though it's real money.
Install the Basic Tools
In order to get started building a cloud-based app for augmented reality, you need to make sure you have all of your tools installed and ready to use. For this tutorial series, you are going to need Unity, a game engine; Visual Studio, the programming IDE (integrated development environment); and the MixedRealityToolkit.
MonoDevelop, the IDE that has long been bundled with Unity, should work for those who prefer it. However, MonoDevelop is being deprecated when the next version of the Unity beta goes gold, and Unity will begin shipping Visual Studio for Mac on macOS instead. For Windows PC users, they will be shipping Visual Studio 2017 Community with Unity.
The MixedRealityToolkit (sometimes called MRTK) is a repository that has had a group of community members working with Microsoft to find ways to make HoloLens and Windows Mixed Reality development a breeze for new developers. They are constantly finding ways to make the process better.
I've discussed all of these tools in another guide on Next Reality, so I won't repeat this process here. Instead, you can follow the steps in the article linked below to get all three tools downloaded and installed on your system. However, don't install the MixedRealityToolkit just yet, we'll cover that in the next article.
Get Project Nether
Project Nether is a great shortcut to getting started with Microsoft Azure's cloud services. This is especially true for a Unity developer with little to no experience in network application development. To get it, just download the file below from the Project Nether's GitHub repo and keep track of where you save it on your computer. In the next article, we'll cover installing Project Nether and the MixedRealityToolkit.
What's Coming Up Next
In the next part of this series, we will create a fresh Unity project and get everything prepared to create a cloud-based application or game by installing and setting up the MixedRealityToolkit API and Project Nether. We will follow that guide with a walkthrough of creating an Azure account and setting up our own server for future cloud-based projects.
Cloud computing is a big subject, made bigger in the context of AR. Therefore, let us know what else you might like to learn from this or another related series. As always, nothing is set in stone. If you feel like you have a question others would benefit from, don't hesitate to tell us.
- Follow Next Reality on Facebook, Twitter, and YouTube
- Sign up for our new Next Reality newsletter
- Follow WonderHowTo on Facebook, Twitter, Pinterest, and Google+
Cover image and screenshots by Jason Odom/Next Reality


Comments
Be the first, drop a comment!