


After previously learning how to make the material of an object change with the focus of an object, we will build on that knowledge by adding new objects through code. We will accomplish this by creating our bounding box, which in the end is not actually a box, as you will see.
For those longing for a something a bit more advanced, you're in luck, because this chapter in building dynamic user interfaces is all code. We will look at a few new ideas like world position versus local position. This will lead directly into bounds and the different versions that Unity offers. We will also learn about an idea known as rubber duck debugging, because sometimes when you are stuck, the best thing you can do is figure it out yourself.
First, we need to make a few changes to our manager to account for a couple of edge cases that could arise. I am kind of glad that I started the actual tutorial with a random object from the asset store.
Update the System Manager
So, as I made my way taking the original version I made for this tutorial series and re-organizing a bit as I go, with the new random object from the asset store thrown in, I began running into a few infinite loops. Obviously, computers do not like these; in case you have never experienced it, Unity will completely lock up.
Not good.
One edge case we need to account for in our dynamic system is an object that is the parent to many children and grandchildren, and the possibility that does not have a mesh, renderer, or collider. It is a rather common practice in Unity to take an empty object and use it as the parent for many other objects.
Enter a wonderful shortcut to determining the eldest parent in a family, transform.root , and, in our case, a way to make sure that we are only putting the BoundingBox class on that object.
In the code from the previous lesson, replace what is currently inside our for each loop in the NRSRManager. While the lines of code are only minor changes, they really make a difference.
- Check to see if each object root object, in our collection of FilteredObjects, has the BoundingBox class attached.
- If it is null then we add the BoundingBox class and set its isRootObject bool to true;
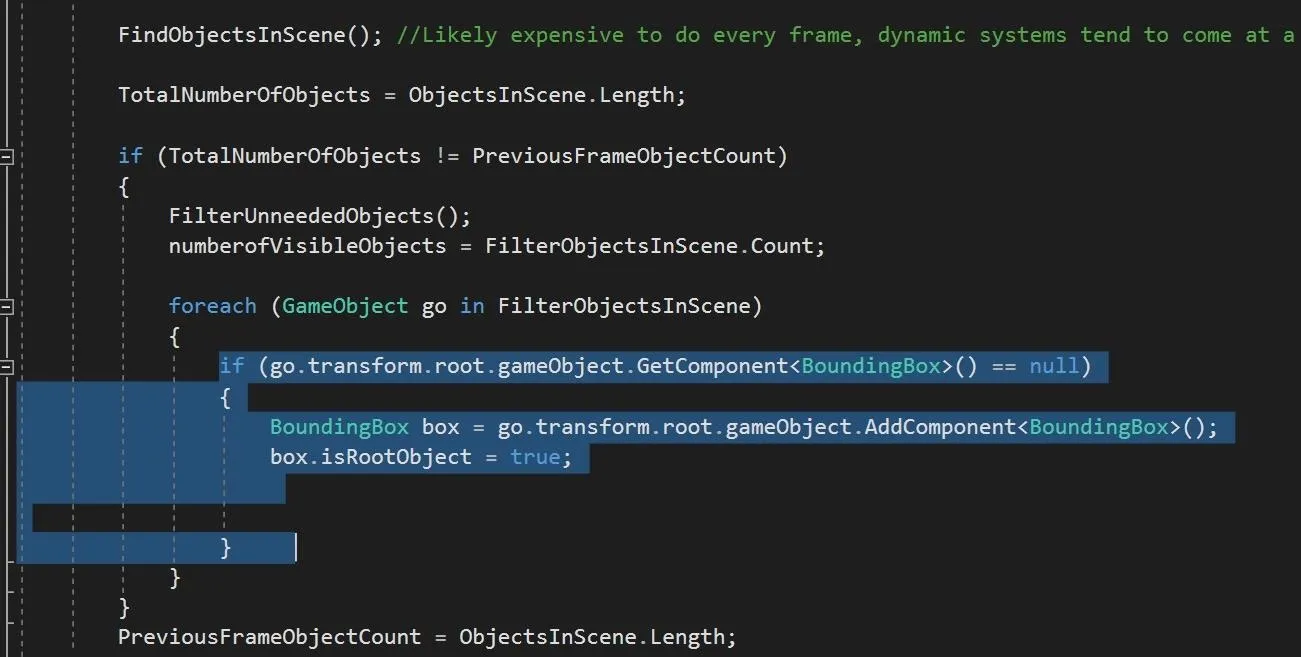
Like is said, not a huge change, but a huge effect.
Build the BoundingBox Class
So now let's move into the heart of our changes for this chapter, BoundingBox.cs.
So, while this first section only has a few additional declaration, the rest will be unrecognizable. We are completely deleting the material switching from the previous chapter to set up object spawning instead. It might be worth your time to delete everything past the Start() function and just follow along.
Here you will notice that the CurrentMat is gone and has been replaced with a collection of various declarations.
- GameObject SRSBoundingBox: This is a reference to the object, and possibly any children it has. It may seem counter-intuitive that the BoundingBox class creates the BoundingBox but is not itself the BoundingBox. This gives us an easy way to turn the actual bounding object on and off.
- Bounds SRSBounds: We will get into bounds in just a bit.
- bool isActive: Is our bounding box active? It is helpful to know easily.
- bool BoundingBoxCreated: used to help in making sure we don't create too many of a certain object.
- bool isRootObject: As seen in the step above, we activate this when we know we have the root object accessed.

Create Update() Function
Here in our Update() function, we accomplish two main things.
- First, we determine if our BoundingBox has been created and that it is the root object, in which case we trigger the creation of the BoundingBox and set its bool to true.
- Second, we check that our bounding box gameObject is not null; if it is not, we can set it to active or inactive depending on if the user is focused on the object or not.
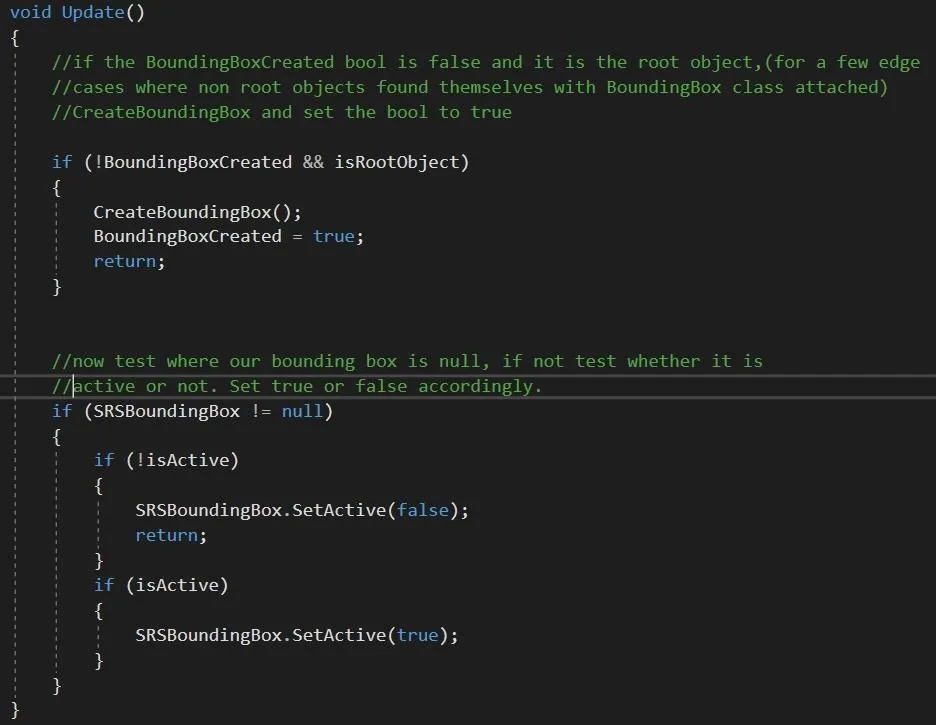
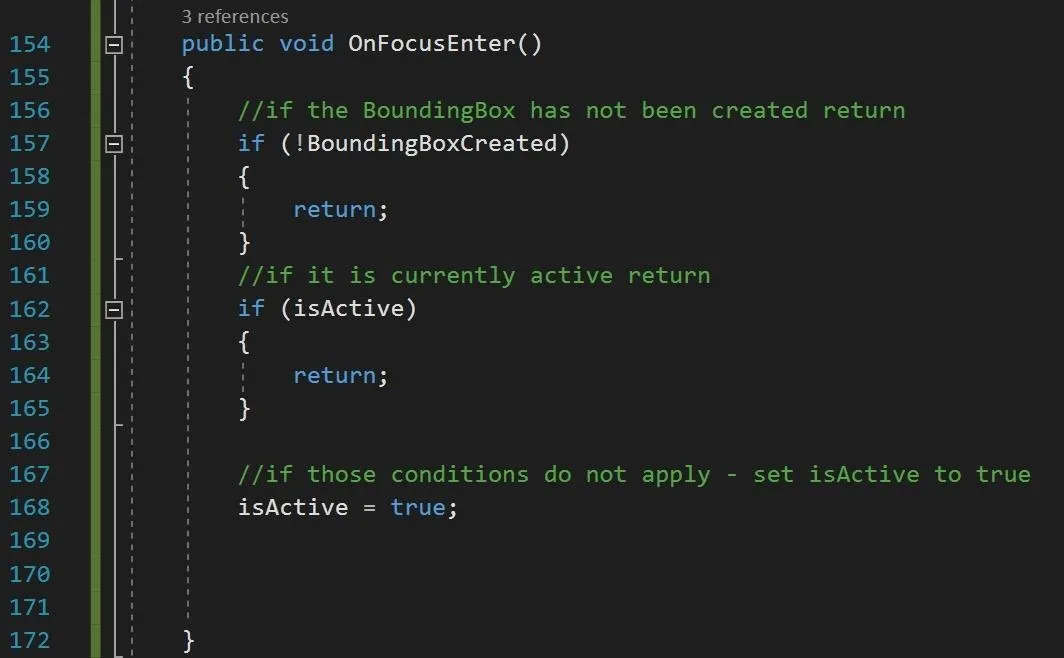
If you look at the OnFocusEnter() and OnFocusExit() methods from the last lesson we are checking the BoundingBoxCreated bool, and if it isn't we get out of this function. Basically, if the object that we want to activate does not exist, we have not need to go forward.
After that, we check to see if it is currently active. If it is we return. Finally, we set isActive to true.
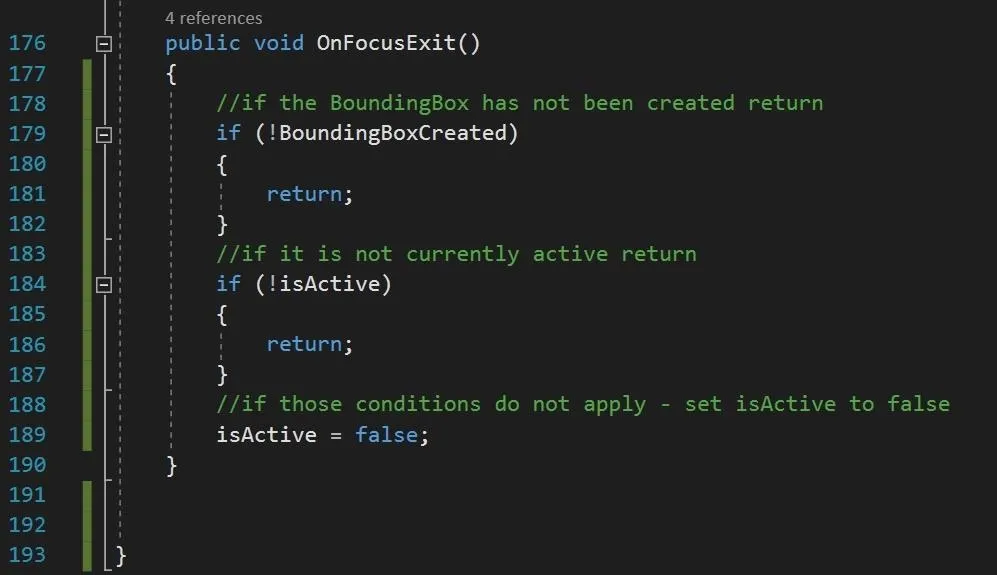
OnFocusExit() is almost exactly the same, from the other side of the looking glass. If there is a bounding box and isActive is true, set isActive to false.
Establish Bounds
So before we get into actually creating the object, let's chat a little about bounds. Bounds is a class provided by Unity that allows us to determine the extents of an object, along with a ton of other useful information about the object that we can use in various ways. It can return the center or the size of X, Y, or Z, and it can also produce a minimum and maximum for each axis. While we will not be using this to create our bounding box, because that would be too easy, we will be using it to position our endpoints or handles.
Bounds come in three main varieties, with each flavor having its own take on the coordinate system around it.
- Collider: The world space bounding volume of the collider.
- Mesh: Axis-aligned, local space-based bounding box.
- Renderer: Axis-aligned, fully enclosed, world space object.
Local space and world space themselves can be confusing, to say the least. Basically, world space is an absolute coordinate system, such as the root objects in our system. Local space, on the other hand, is a relative coordinate system, as in children relative to their parents.
When we work with transforms, we have the option to use position or localPosition. The same is true for rotation as well. Knowing which you need for which application can be a bit of the fun. Oops, I think I just misspelled hard work.
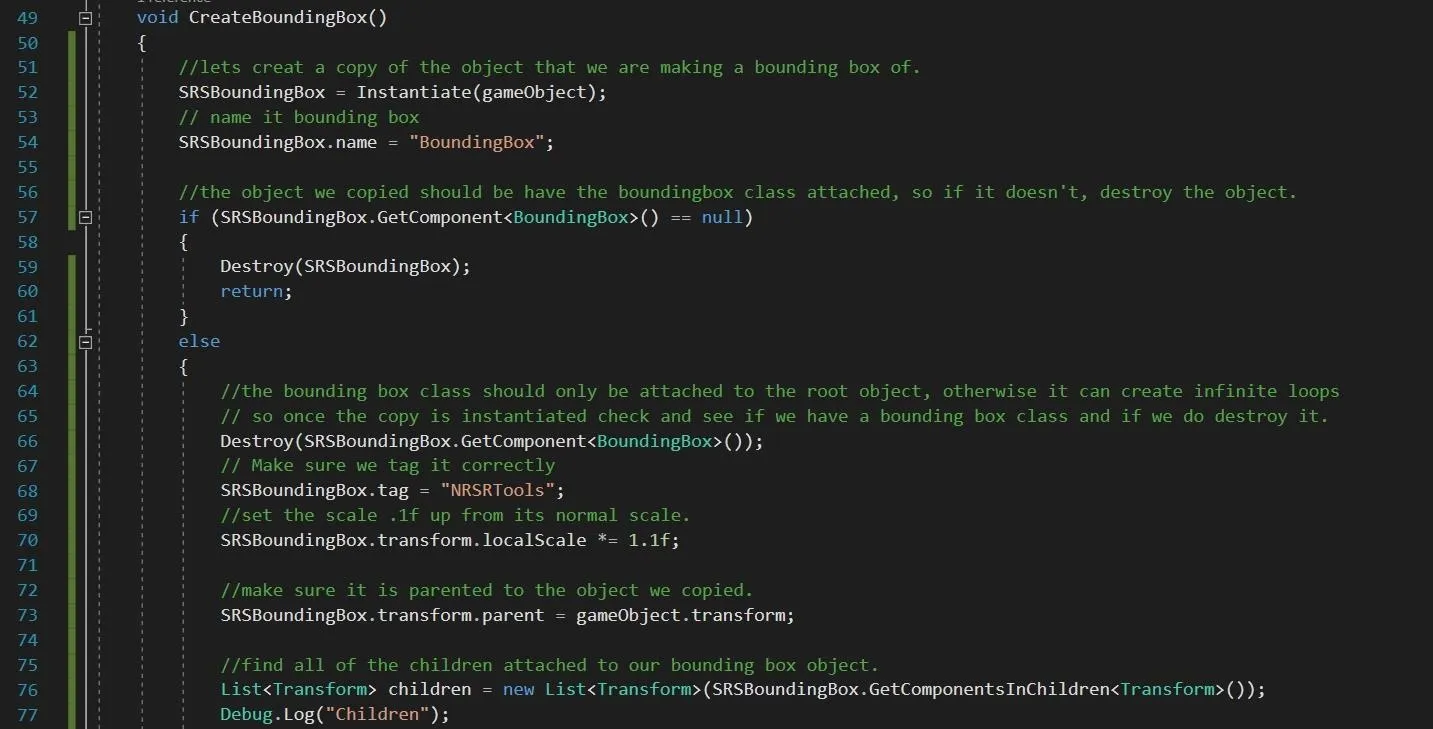
Let's do a play-by-play with the code here.
- Instantiate (gameObject) is actually creating an exact copy of the object BoundingBox is attached to — and anything attached to it.
- We then name the object "BoundingBox".
- If our newly created object does not have BoundingBox attached to it, destroy it. It should. We should only ever be copying the root object with BoundingBox attached.
- If it does have BoundingBox attached, destroy the BoundingBox class and begin adding the things we need. While we the object the class on that object can create an infinite loop, which as we said, is bad.
- Add our "NRSRTools" to the new object.
- Make our scale 1.1f of the original object.
- Set the object's parent to be our original object.
- Now we will create a list of transforms called "children" using GetComponentsInChildren
() to fill that list.
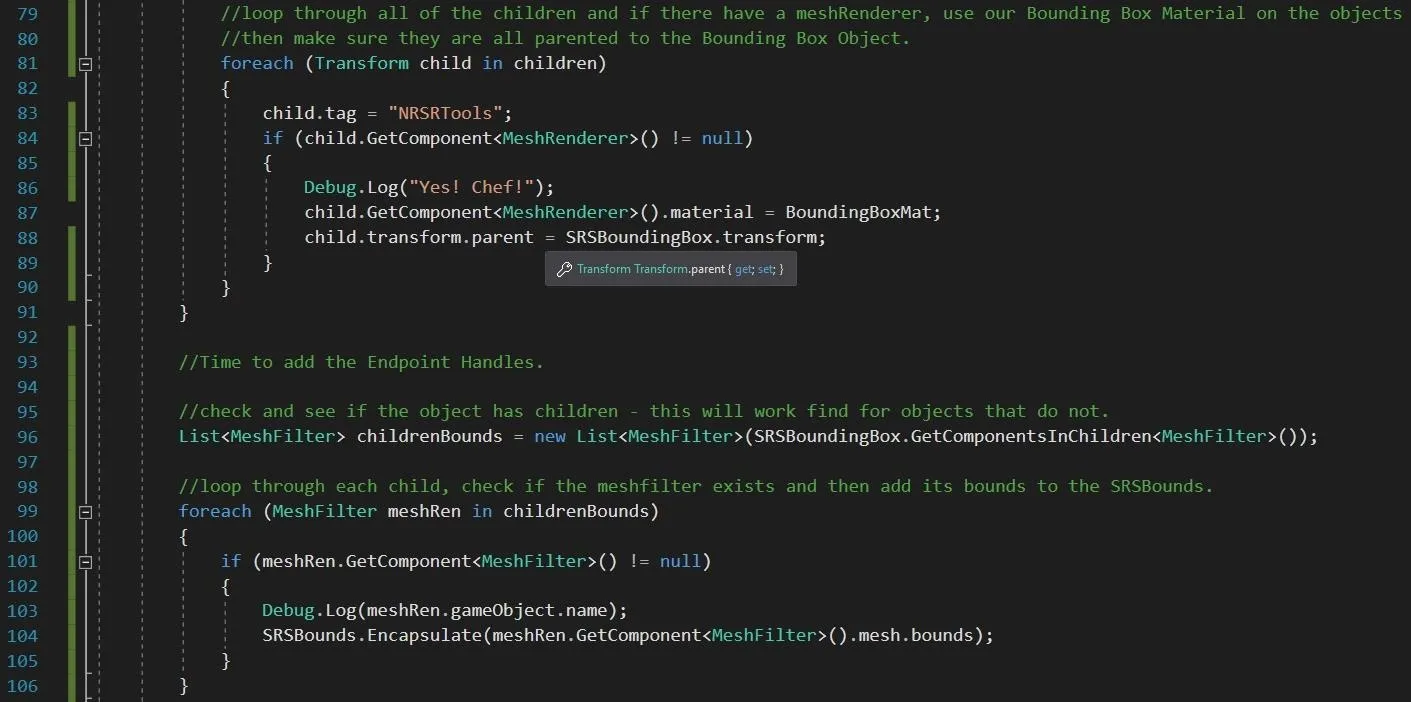
As continue the procedure, we will put our first material on each of the objects in the list.
- We loop through the children list and change their tag to NRSRTools so the system will ignore them.
- Then we determine if they have a MeshRenderer attached. We don't need any crashes, and not all objects do.
- Then we have our children letting Chef know they are present.
- Then we apply the material and reparent them to the recently cloned object.
After adding our material to all the objects, it is time to actually create our bounds. This is done using the Bounds.Encapsulate() method.
- Create a List<> of all the children in the hierarchy that contain a MeshFilter.
- Loop through the list to make sure it actually does have a MeshFilter.
- Using the Encapsulate() method, add this current child's bounds to our main bounds object.
Create the End Points
Now using the bounds we just put together, we will create our endpoints or control handles for those used to working in 3D applications. In our case, these are simple for reference and appearance, they will not function actual control handles. We will not need them, as you will see soon.
Here we use our bounds minimum and maximum to create our nearest and farthest control points using the 1.1f scale value from before. And then a combination of those same minimum and maximum values with their X, Y, and Z elements to create a total of eight points. We save each of these points as individual Vector3 variables.
It should be noted that we could easily use these same points to create an actual box around our object. In the previous version of this tutorial series, that is exactly what we did. But I found that using the mesh of the base object just looks better.
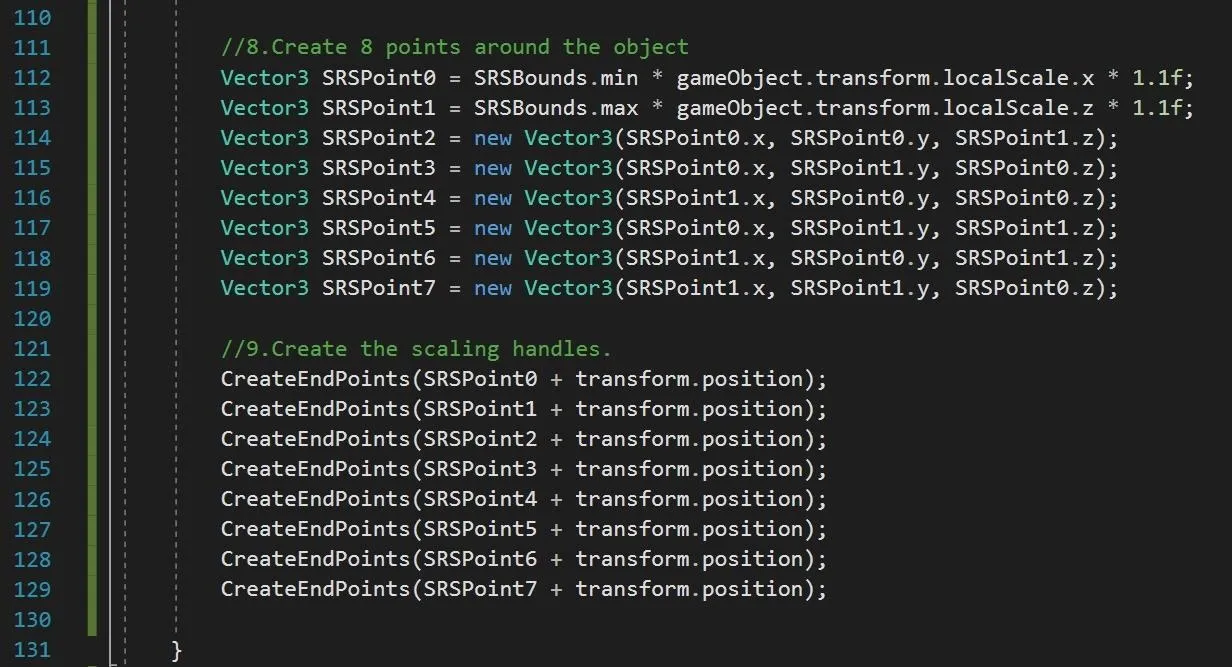
Finally, we run our newly created point positions while adding the transform.position of our main object, through a method called CreateEndPoints().
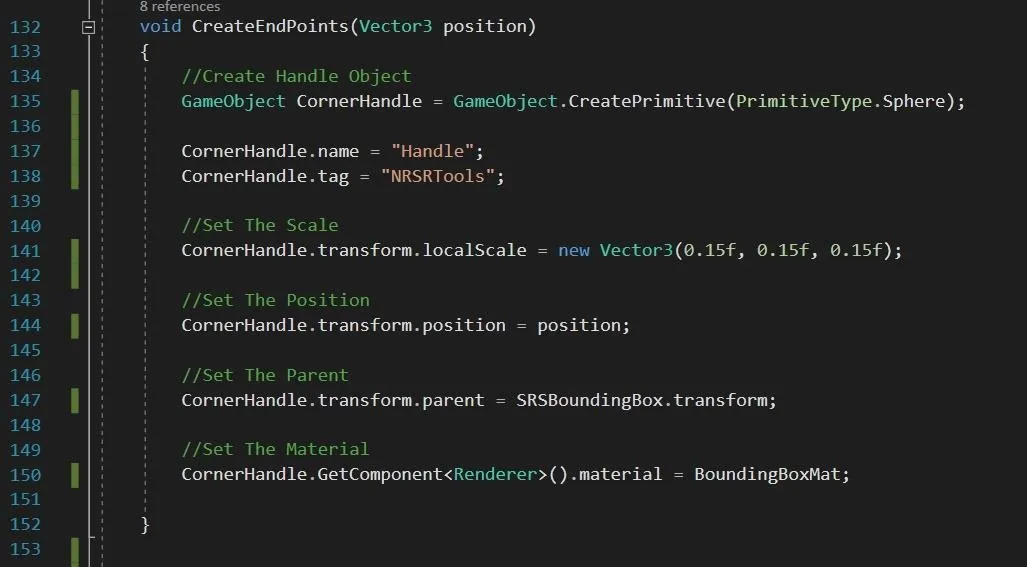
- Use GameObject.CreatePrimitive to create a sphere, but it could be any of the Unity primitives.
- Name it Handle and tag it so it will be ignored by the system.
- Scale is down to 0.15. This could have also been represented as CornerHandler.transform.localScale *= 0.15f; but we already did it that way earlier.
- We set our newly created spheres position to be based on the position vector that we put into the function call.
- Set the parent to be our bounding box object.
- Apply the BoundingBoxMat to the sphere.
And with that, we are done! Here is the full code for our BoundingBox class in case you would rather copy and paste it instead of typing it out manually. Though I am a big fan of typing it, it all depends on how you as an individual learn best.

Now if you build, compile and deploy, you should see our object with its surrounding transparent copy and the eight endpoint spheres.
Well done if have made it this far! Don't worry though the journey continues. Next up we will create the tool UI elements that will be used to change out objects.
- Follow Next Reality on Facebook, Twitter, and YouTube
- Sign up for our new Next Reality newsletter
- Follow WonderHowTo on Facebook, Twitter, Pinterest, and Google+
Cover image and screenshots via Jason Odom/Next Reality


Comments
Be the first, drop a comment!