
When making a convincing mixed reality experience, audio consideration is a must. Great audio can transport the HoloLens wearer to another place or time, help navigate 3D interfaces, or blur the lines of what is real and what is a hologram. Using a location-based trigger (hotspot), we will dial up a fun example of how well spatial sound works with the HoloLens.
In this tutorial, we will be creating a spatialized audio object that revolves around a target object. You will be able to stay put and listen as the hologram travels the space around you, or move about and explore the changing audio freely.
In order to jump right in, you will need to first complete the User Location Hotspots tutorial. This tutorial also requires using a HoloToolkit version that incorporates the user input modules (I am using a version pulled from GitHub on April 2017).
Okay, we've got the routine paperwork out of the way. Let's start building!
Step 1: Setting Up the Basics
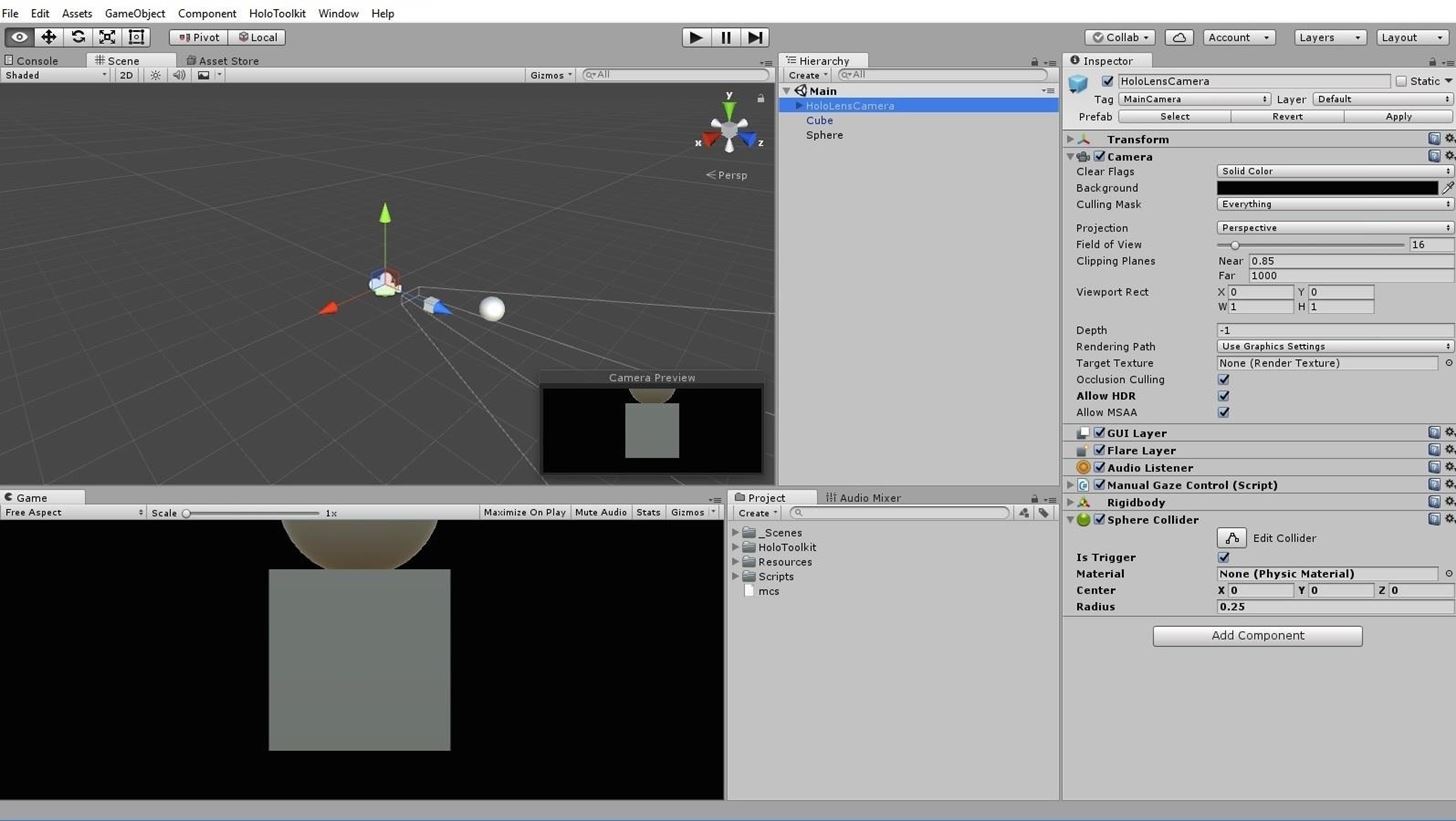
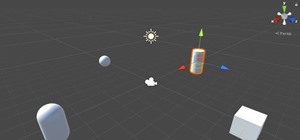
Let's start by dragging the InputManager prefab from HoloToolkit -> Input -> Prefabs folder in the Project window into the top level of the Hierarchy window. Let's also do the same for the cursor by dragging in the DefaultCursor found in the HoloToolkit -> Input -> Prefabs -> Cursor folder. Adding both of these prefabs quickly gets our app ready to handle gestures.
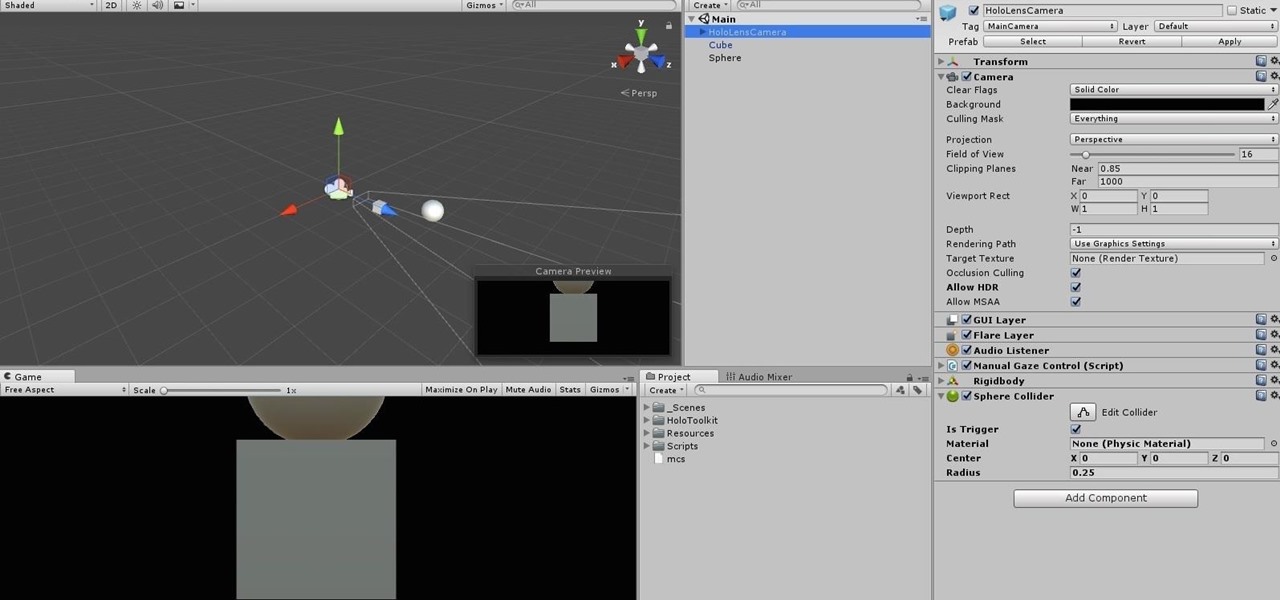
A quick side note, if you use the Holographic Remoting Player to remote to your HoloLens while in Unity (I hope you are!), you will need to check the Allow HDR box on the Camera component of the HoloLensCamera GameObject. Otherwise, you'll see a blank screen on your HoloLens when you play the scene in Unity.
Step 2: Modify the Existing Hotspot
Ideally, we want to be able to move our hotspot with the tap-and-hold gesture. However, we only want that to happen when we are gazing at the cube; not its oversized hotspot collider. We need to make a few changes to achieve this.
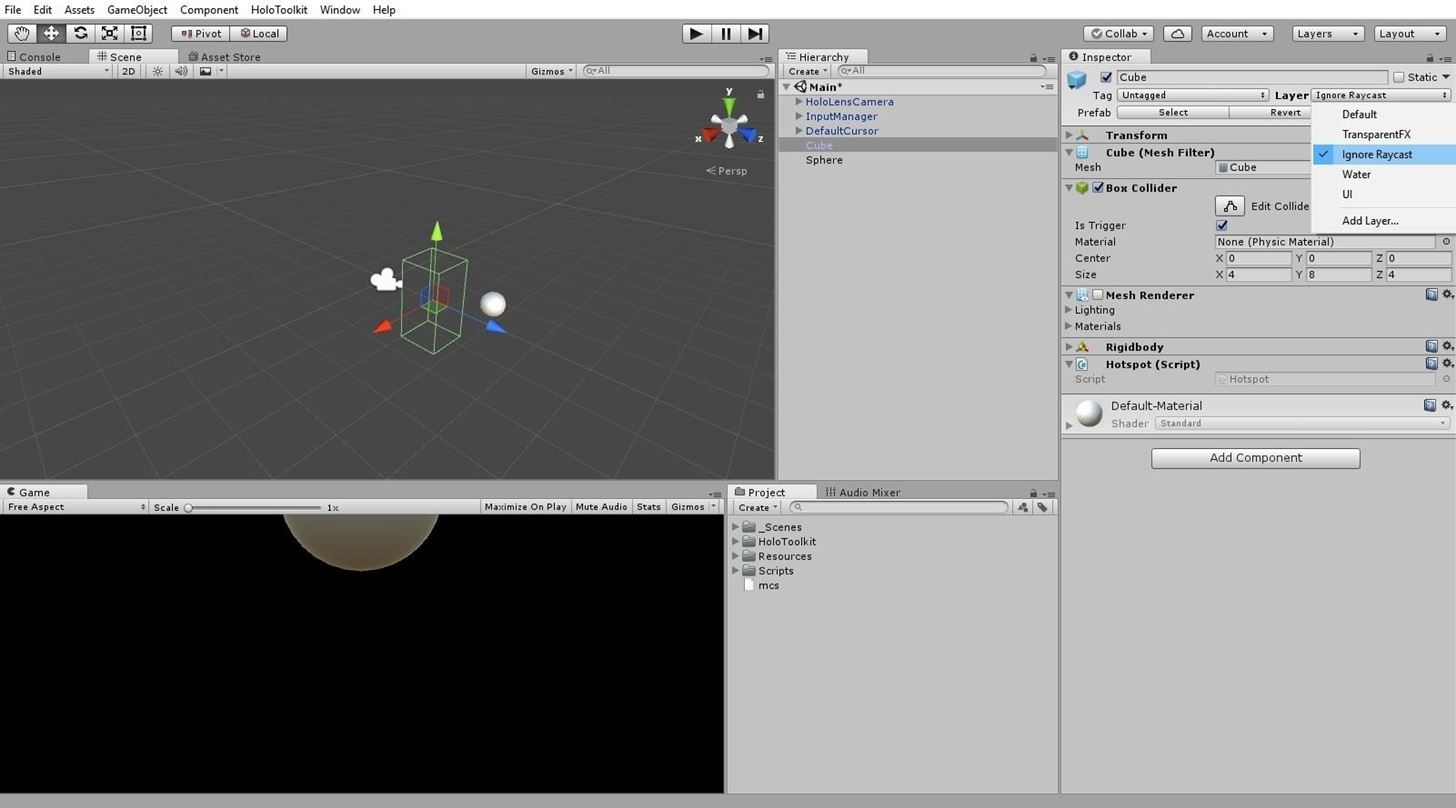
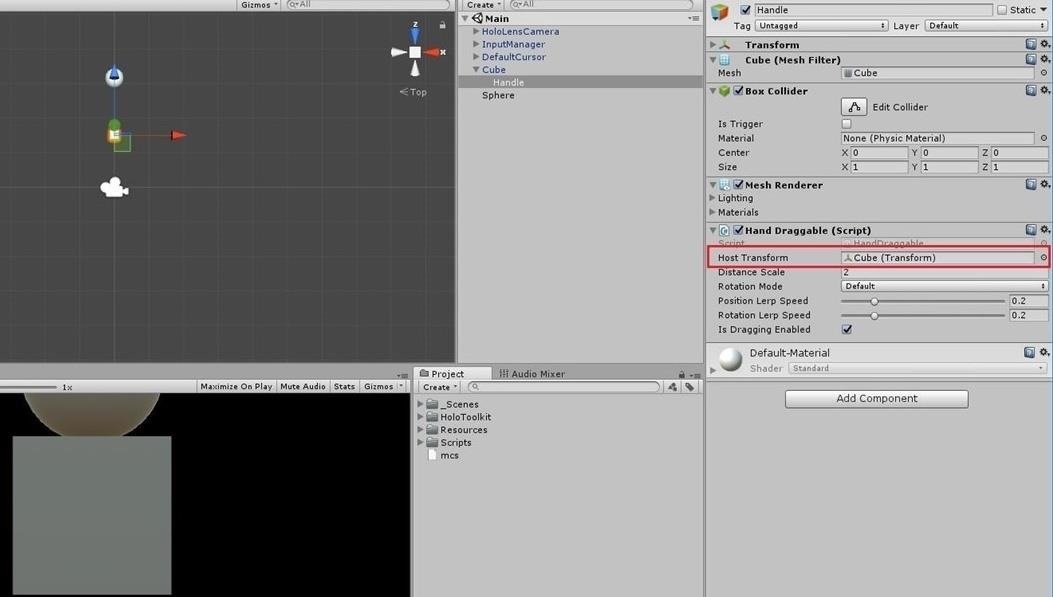
Highlight the Cube, then in the Inspector, deselect the Mesh Renderer component. Use the Layer drop-down and select "Ignore Raycast." Since this invisible object is now just being used to trigger events, we don't want our gaze to be intercepted by its collider. Not only is it disorienting for the user, but it will also sabotage our gesture action we build later in this step.
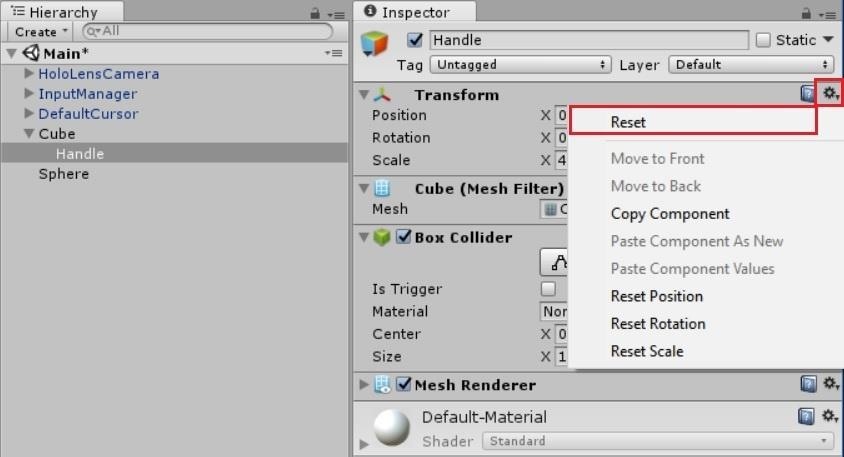
Next, create a 3D Object -> Cube. Rename this "Handle." In the Hierarchy, make this object a child of the existing Cube object. Select Handle, and using the gear menu, "Reset" its Transform. Also, ensure its Layer is still set to "Default."
Attach the "HandDraggable" HoloToolkit script component to our Handle. Do this by clicking "Add Component" while inspecting our Handle. Type in "drag" and press Enter. If we were to test now, we'd have the problem of the Handle moving, but our parent and its collider staying put. That kinda defeats the purpose.

A nice feature of the script is that it already provides us a way to move the parent and not just our child. With Handle selected, we simply need to drag the parent GameObject from the Hierarchy to the "Host Transform" empty space of the Hand Draggable component.
There is one more thing we need to address. Unity will trigger the parent's "OnTriggerEnter" even when the child's collider is triggered. This is a feature for creating Compound Colliders. However, we don't want this behavior as it causes our trigger events to fire twice. To solve this, we will add a Rigidbody on our Handle. Select Is Kinematic and deselect Use Gravity.
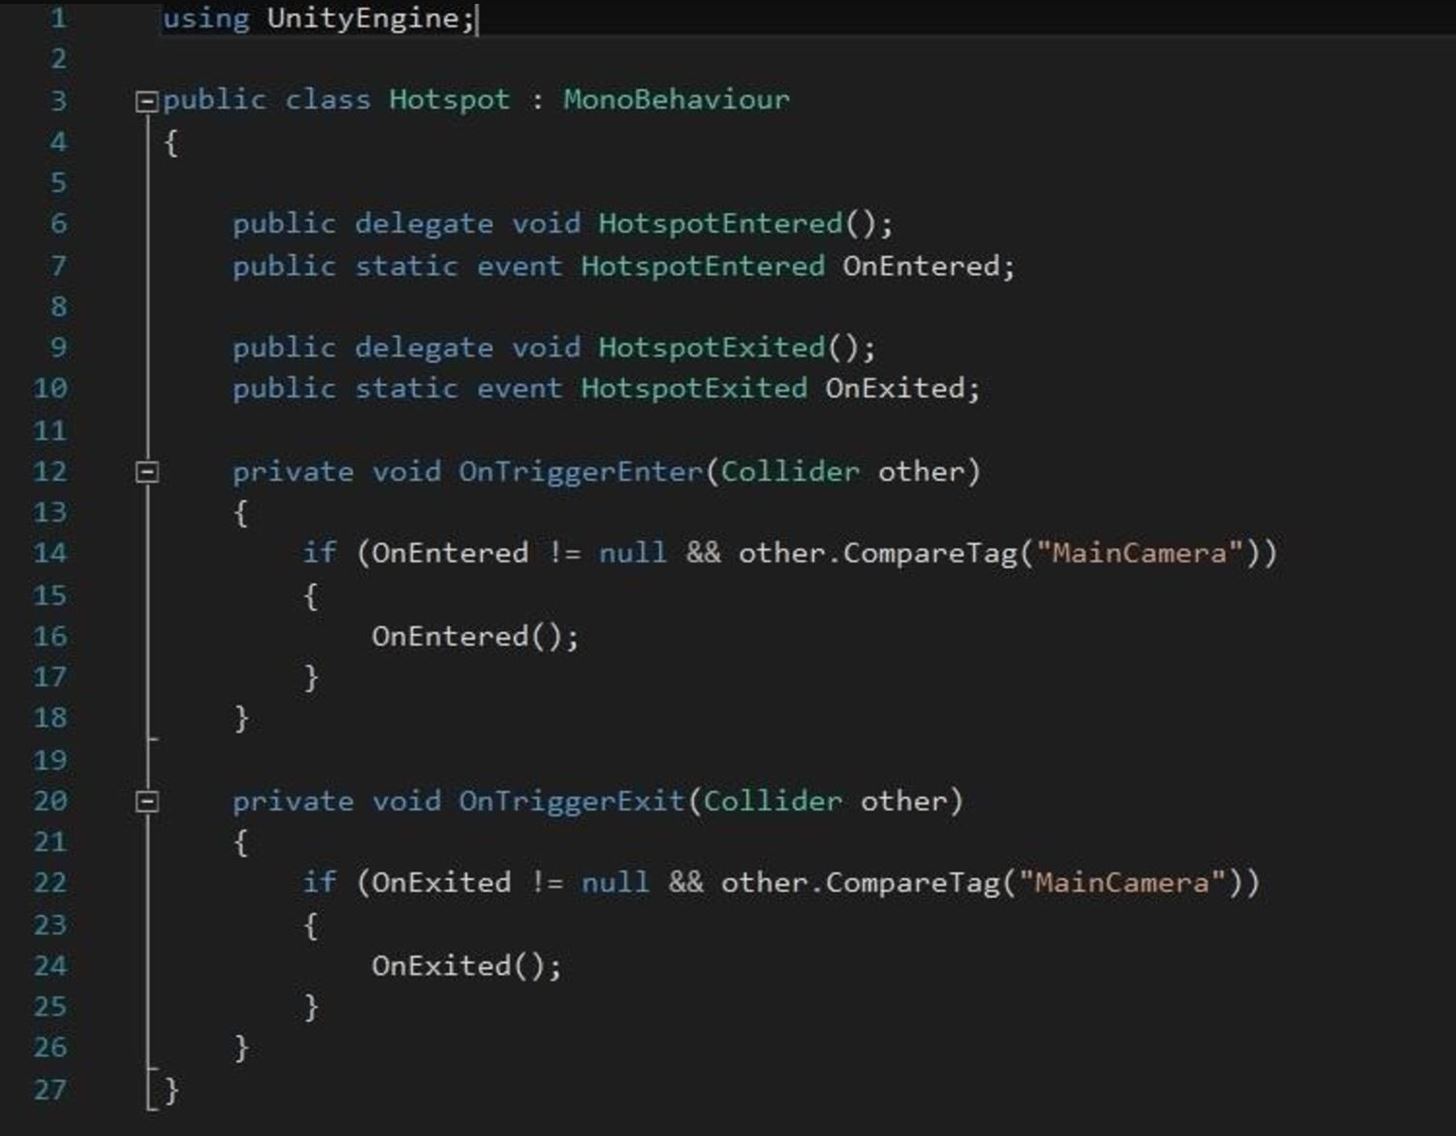
The problem now is that the child collider will "collide" with the parent collider as soon as the scene starts. To fix this, we will add a simple conditional statement where we invoke our event.
If you recall from the previous tutorial, we were using events for triggering our hotspots. Events provide a useful way of notifying subscribers that something we care about has happened. We declare these events by using delegates.
Grab the code here or open up the "Hotspot" script and update the "If" statement in our "OnTriggerEnter" function to:
if (OnEntered != null && other.CompareTag("MainCamera"))
Do the same for the "OnTriggerExit" function. It should look like this:
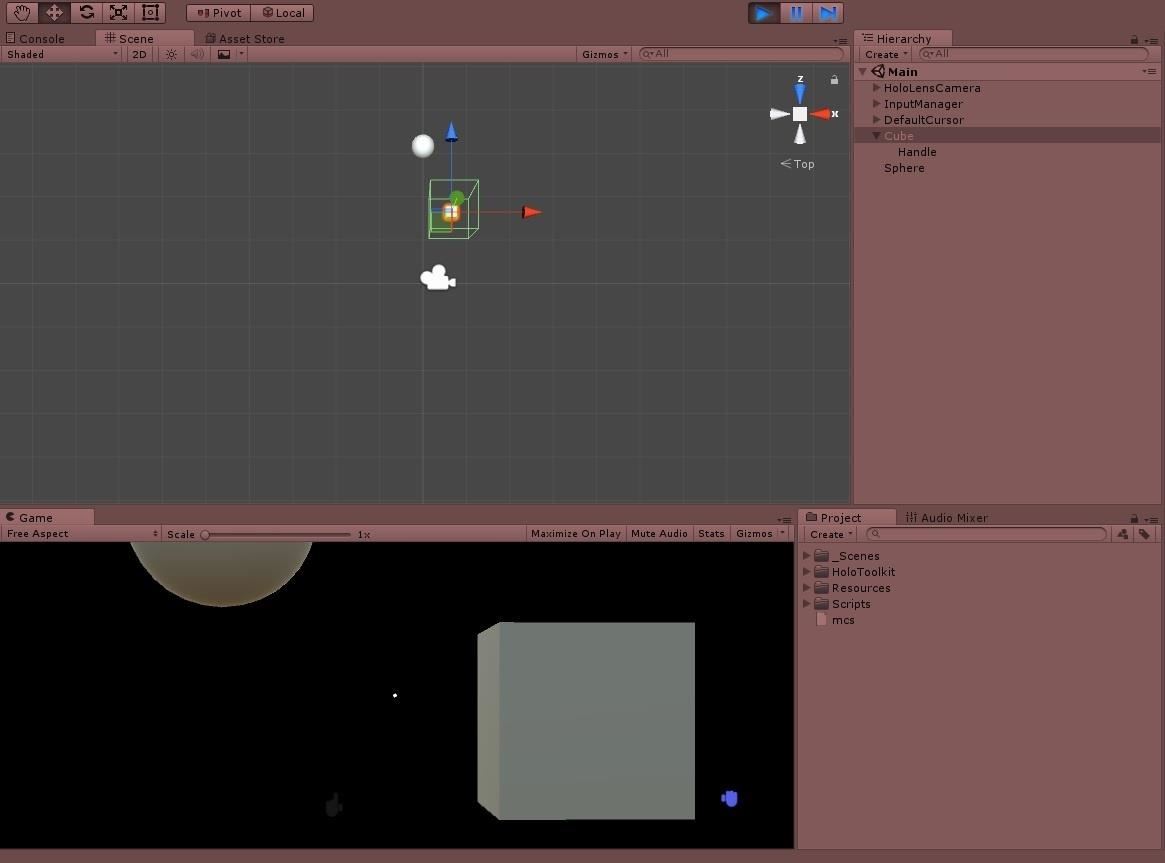
Now is a good time to test if our hotspot is working as expected. Play the scene and check that the Cube (parent) and its collider stays with the Handle (child). Also, check that the cursor only "hits" the Handle and ignores the oversized collider.
Step 3: Spatial Audio Configuration
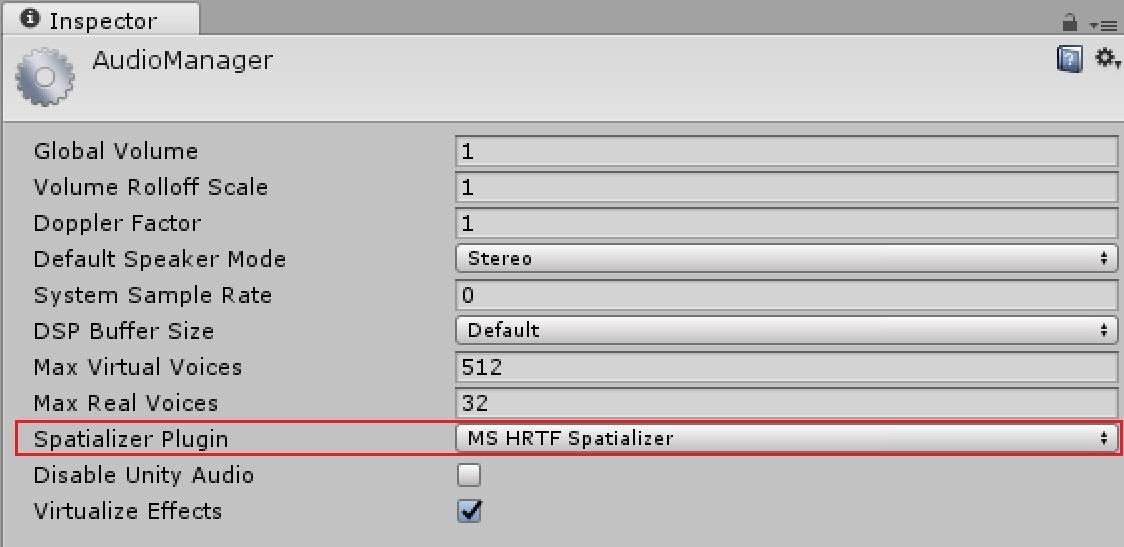
Now that we have the objects in our scene in place, let's focus on configuring audio for HoloLens use. Open up the Audio Manager by going to Edit -> Project Settings -> Audio.
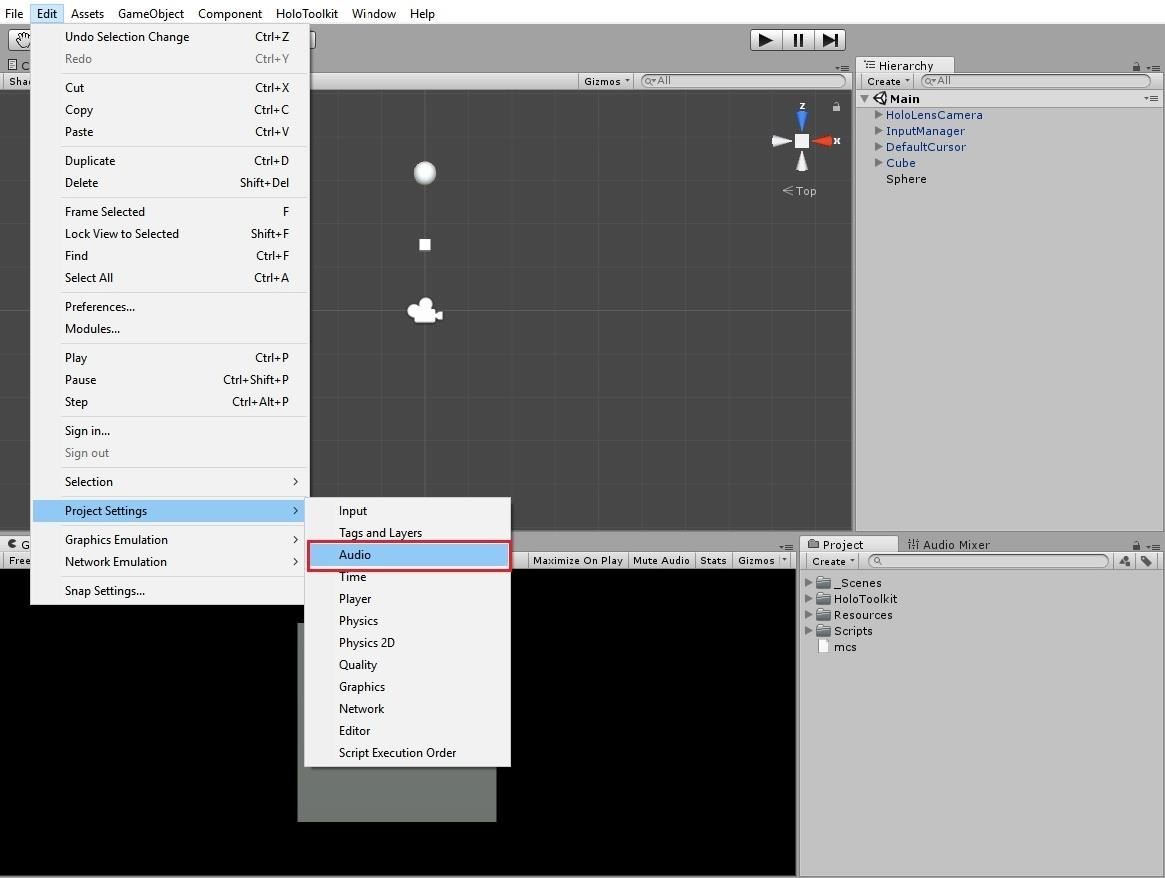
Set the Spatializer Plugin to "MS HRTF Spatializer."
Step 4: Download Audio Files & Set Up Component
Here we are! We are ready to add some audio. For this tutorial, you can use any compatible files you would like, however, I highly recommend downloading the three I have curated for you. The duration, variety, and quality work well for our demonstration. Besides, they are free at Freesound. If you don't already have an account, it will take roughly a minute of time and very little information to create and use one.
Follow the links and download the following audio files:
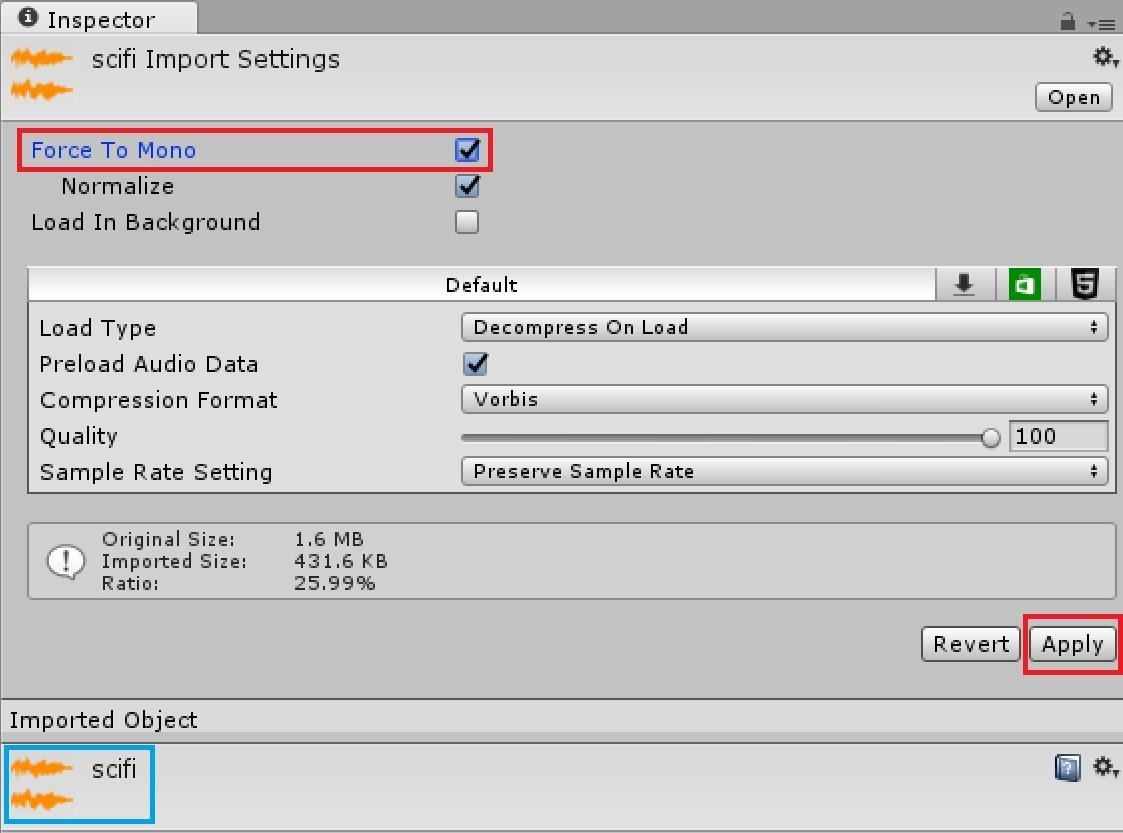
Locate where you have downloaded the files to and rename them "helicopter," "scifi," and "creepyVoice," respectively. Back in Unity, create a folder called "Sounds" in the Project window. Drag the three newly renamed audio files into this folder.
In the Project window, one by one, select each audio file, and in the Inspector, select the Force To Mono box and click "Apply." When using Spatial Audio, you want your files to be in mono; Stereo files don't get processed properly and actually significantly muddy the illusion of spatialized sounds.
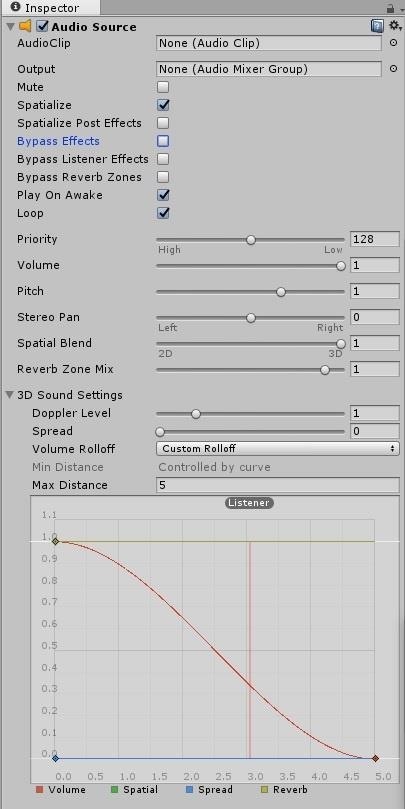
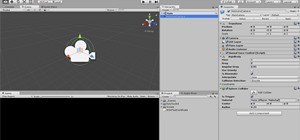
Back in the Hierarchy window, highlight the Sphere GameObject. Click "Add Component" and add an "Audio Source" component. To configure the Audio Source, do the following:
- Check Spatialize box.
- Check Loop box (as we want our sounds to continue until we manually stop them).
- Set Spatial Blend to 1.
- Set Volume Rolloff to "Custom Rolloff."
- Set Max Distance to 5 (to emphasize the effect of sound placement).
Step 5: Scripting the Audio
Time to code up the heavy lifting of the spatialized hologram audio. Create a new script component on our Sphere and name it "HotspotAudioCue." Paste in the code found here and save the file.
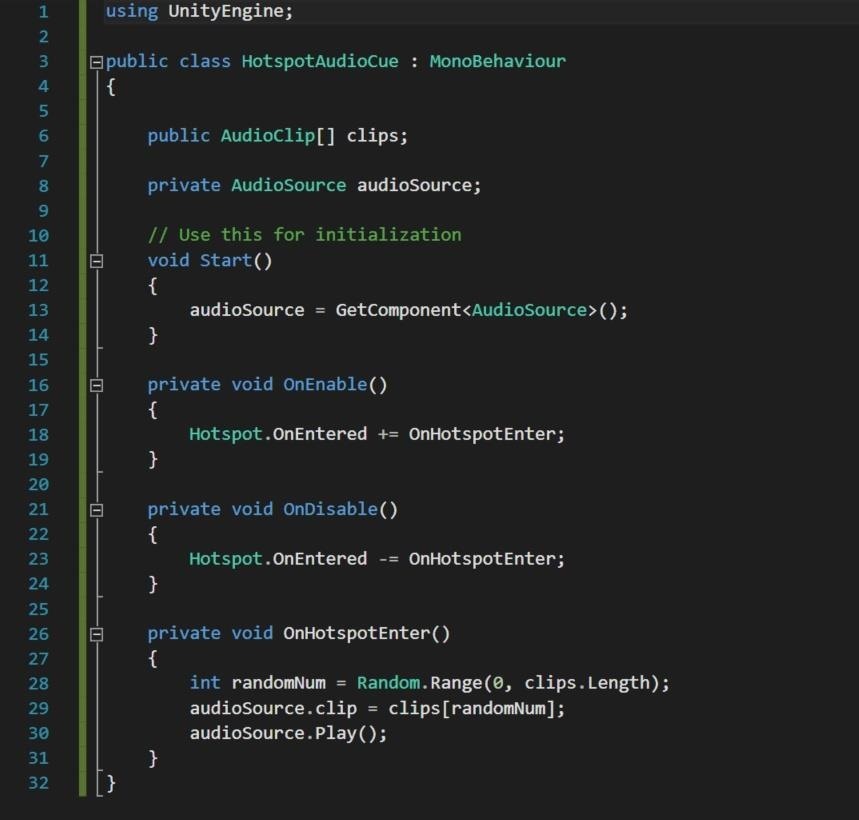
We first created a public array of audio clips. In the "Start" method, we get the AudioSource component. We then subscribe (and unsubscribe) to the "Hotspot.OnEntered" event.
When the event is fired, we generate a random number to pick one of our audio clips to play. We assign that clip to our AudioSource component and call the "Play" method.
We are almost ready for testing. The last thing we need to do is add our actual audio clips to the array in the Inspector. With our Sphere highlighted, take a look at the Hotspot Audio Cue component. Here we can set Size of the Clips to 3. Press Enter.
A drop-down with three assignable elements will appear. Drag each audio clip from your Sound folder into a blank Element field.

Save and play the scene, then drive the camera over the hotspot. The audio should cue up. Completely exit the hotspot (entirely of the parent's oversized collider) and reenter. A clip should begin playing from the beginning upon each reentry of the hotspot. While the clips are chosen at random, with only three clips, don't be surprised to hear the same one picked several times in a row.
Step 6: Let's Make It Fun
We have all the pieces in place for spatial goodness. Let's do something fun with it!
By modifying the code in our "HotspotAudioCue" script, we will create a simple effect of an object with sound orbiting around the hotspot. This will hopefully act as a catalyst in sparking some creative ideas for your own projects.
Paste in the completed code found here.
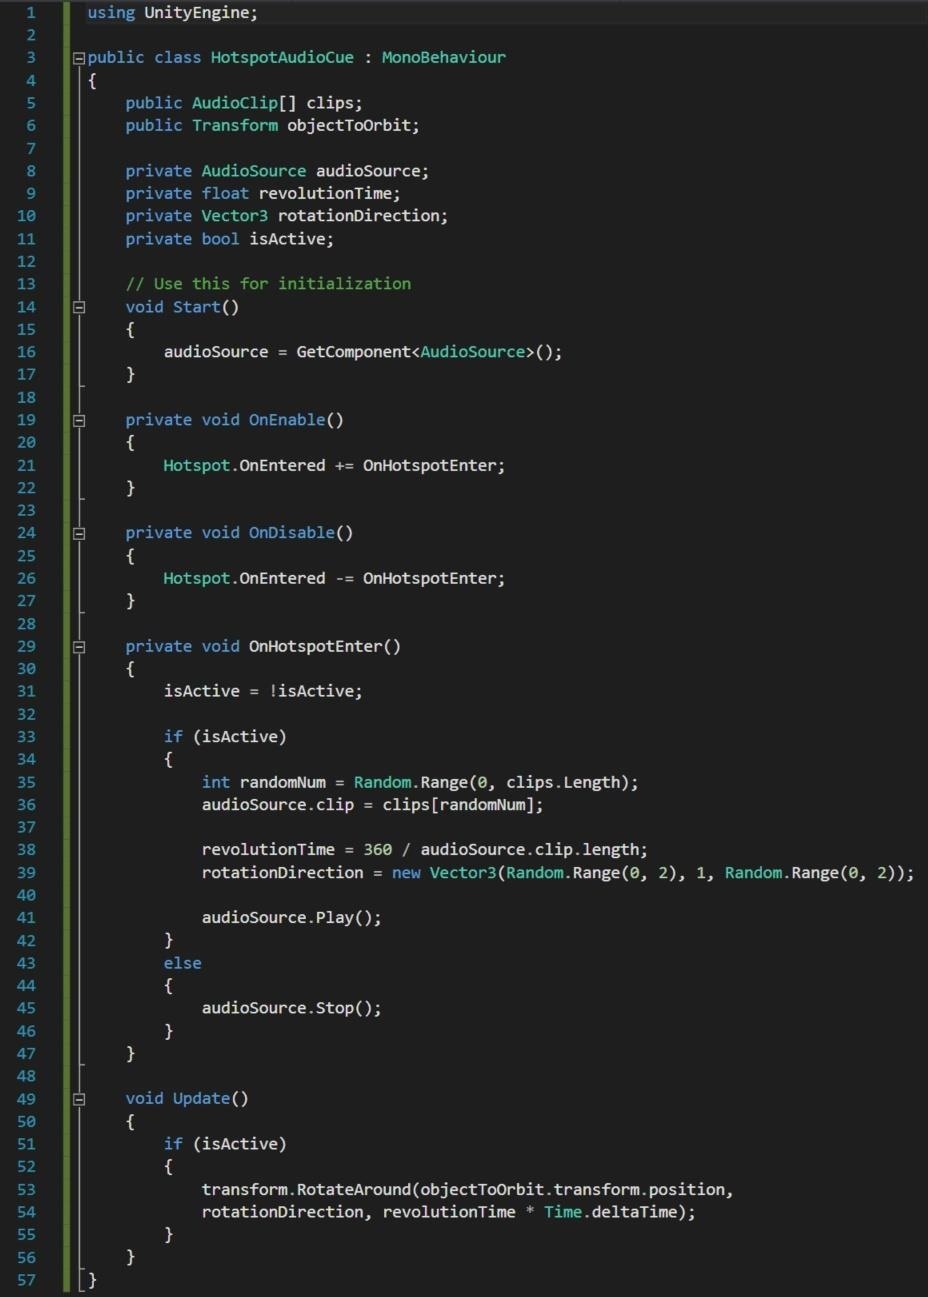
Let's take a minute to look over the changes. Our goal is to fill in the values for the built-in "RotateAround" function found in the "Update" method. While we are using the "Update" method for simplicity's sake, I would usually prefer implementing this using a Coroutine.
When "OnHotspotEnter" is called, we toggle its current active state and decide what to do. If it is now inactive, we simply stop our clip. If it is active, we take the randomly selected clip's length and divide 360 (degrees) by it. This will mean the orbiting object will make one full revolution per loop of the clip. We also want to randomize the rotation direction to make it interesting. Notice the y-axis value is set to 1. This will prevent our object from staying still if all three Vector3 values were to draw a 0.
For every frame "isActive" is true, we throw our values into the "RotateAround" function and let it propel our Sphere hologram around our "objectToOrbit." Speaking of, the last thing we need to do is drag our Cube hotspot from the Hierarchy to the empty Object To Orbit slot in the Inspector.
Save, play, and test the scene. The first time you drive over the hotspot our audio should start and the sphere should begin its revolution. Exit the hotspot and reenter. Our clip should stop and our sphere should freeze in place. Repeat a few times to ensure all is good. If so, build to your HoloLens and enjoy all that is spatial audio!
The importance of well-implemented audio, whether for atmosphere, guidance, or emotion, cannot be overstated. Much of how our minds process the world around us involves our ears. As we explore deeper into mixed reality, harnessing this power will go a long way in creating compelling apps.
We would love to see how you are using spatial audio in your projects. Please share, along with any questions, feedback, or development quirks you'd like to learn about, in the comments below. Cheers!
Just updated your iPhone? You'll find new emoji, enhanced security, podcast transcripts, Apple Cash virtual numbers, and other useful features. There are even new additions hidden within Safari. Find out what's new and changed on your iPhone with the iOS 17.4 update.


Be the First to Comment
Share Your Thoughts