
As a developer, before you can make augmented-reality robots that move around in the real world, controlled by a user's finger, you first need to learn how to harness the basics of designing AR software for a touchscreen interface.
In recent years, the vernacular for referring to people who consume entertainment has slowly shifted from "viewer" to "user." The catalyst for this change was the move from simple passive-viewing experiences to interactive ones. And while there is, and will continue to be, a need for non-interactive entertainment such as film and TV for the foreseeable future, the demand for new forms of interactive entertainment has been growing at a steady rate.
This form of interactive media, which has recently added augmented and virtual reality to its list, goes well beyond the world of entertainment and has splintered off into education, training, and the work life of nearly everyone.
Therefore, developers increasingly need to learn how to move beyond the 2D interface of the traditional personal computer and interact with the emerging augmented reality world and, in the process, relearn how to make compelling experiences. But, as they say, you need to learn how to walk before you can run.
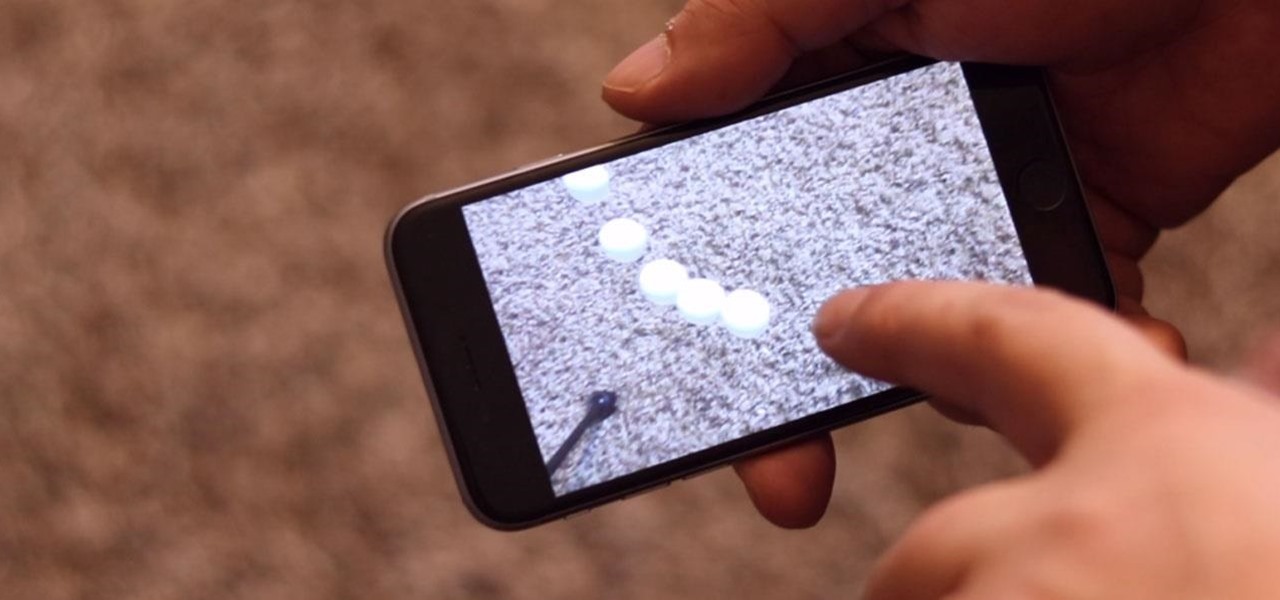
With that in mind, using Unity and ARKit, I'm going to show you how to create a simple touchscreen interaction on an iPhone app. We will use the touchscreen as a trigger, allowing us to create the starting point of a first-person shooter game.
What Will You Learn?
Instead of opening up one of the ARKit examples and building a project from a template, having a reference to build our own project from scratch can be extremely valuable — especially as new versions of Unity come and go and old outdated elements get deprecated out of the system.
So with that, we will put together the minimum necessary components needed to get this project working via touchscreen triggers.
It will be assumed that you have already gone through our previous guide on using the Unity ARKit plugin to create apps. Everything you will need for this tutorial is there. If you have not, at the very least, you need to perform Step 1, Step 2, and Step 3 in that guide before continuing below.
Step 1: Set Up the Camera
In Unity, the user's viewpoint is handled in the engine through a camera object. Whether a headworn device like the HoloLens or a mobile device like an iPhone, the software needs to be able to read and handle the sensor data that comes from the device.
Each device has multiple sensors that are needed to create an AR experience. These include; the camera, gyroscopes, accelerometers, and even the touchscreen itself. What this means for a developer is that these objects can get very complex. This point will be made as you make your way through this tutorial and realize that half of the tutorial is building our camera system.
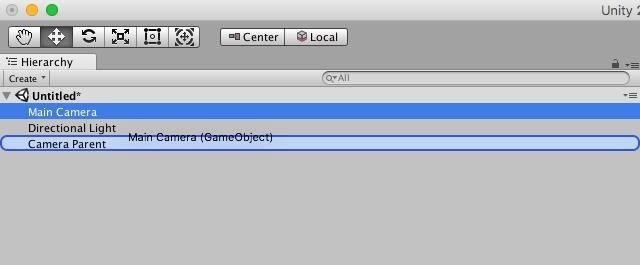
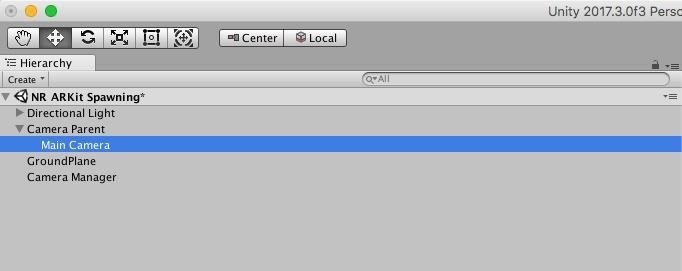
1. Create a Parent Object
First, in the Hierarchy window, right-click and select the "Create Empty" option. Then, name the object Camera Parent. This object is the parent to what will be our entire camera structure. For more information on Hierarchies, see Step 4 below.
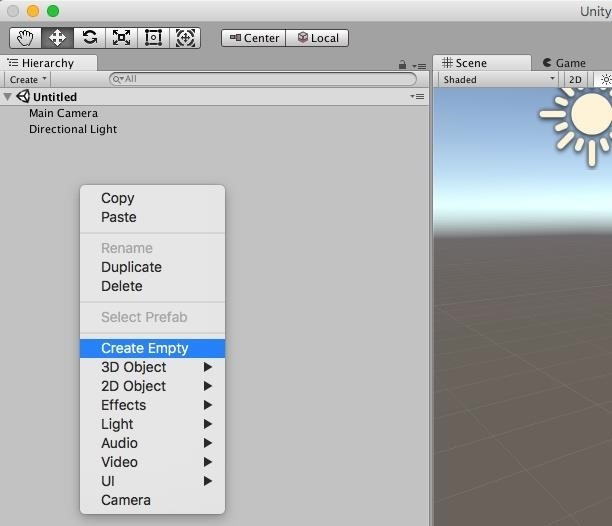
In the same panel, drag and drop the "Main Camera" object on top of "Camera Parent" you created. This will make our Main Camera a child of the Camera Parent. Later in this lesson, we explore hierarchies and why this is important.
2. Adjust the ARKit Settings
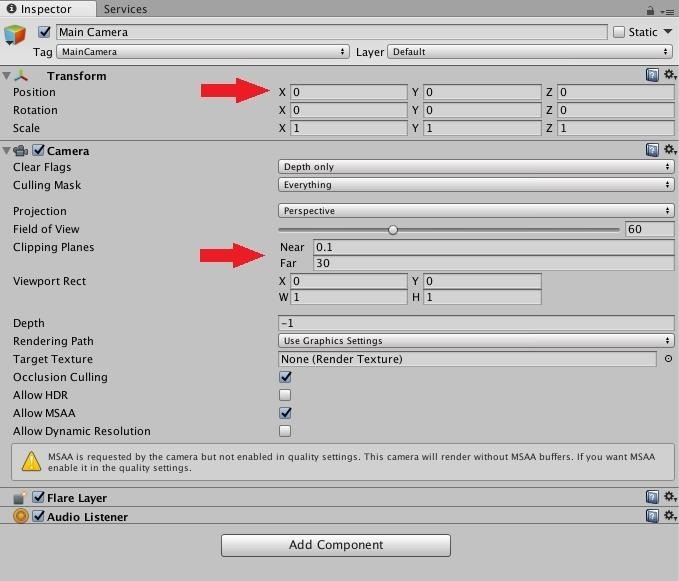
In the Inspector window of the Main Camera, find the Clear Flags heading and click the word "Skybox" next to it. While a Skybox would be great for a VR experience, filling up the unused space with a background, for AR we need that unused space to show the real world. With that in mind, select "Depth Only" from the list.
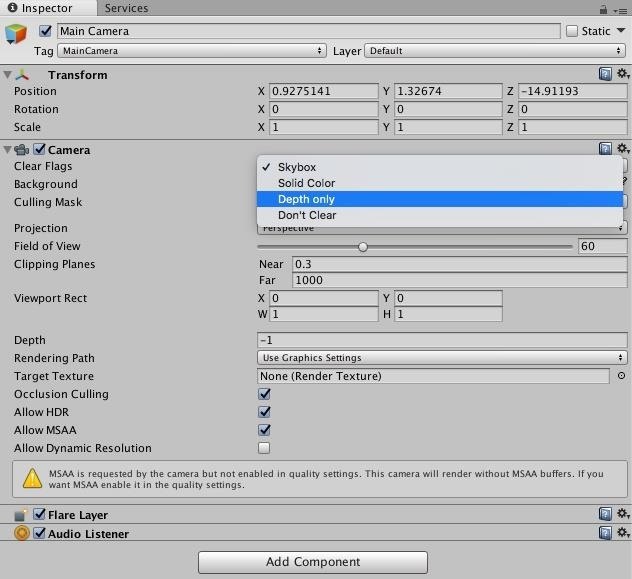
In the Transform component, be sure to check to make sure that the Position and Rotation in all X, Y, and Z elements are set to zero. Generally, you want to start all of your objects at the 0,0,0 point, and if it needs to be moved, move it from there. Otherwise, if you start moving objects into hierarchies, these offsets can be the source of bugs, which can be tough to track down.
Now, find the Clipping Planes heading and change Near to 0.1 and Far to 30. The Clipping Planes are a range relative to the camera that determines what is rendered. If an object is farther than 30 units or closer than 0.1 units from the camera, they are clipped, or simply not rendered. You can choose different numbers, but keep in mind that these are the preferred numbers because they are the most optimal for the hardware.
Step 2: Set Up ARKit Classes with the Camera
Now, we need to add two Unity ARKit classes to our camera.
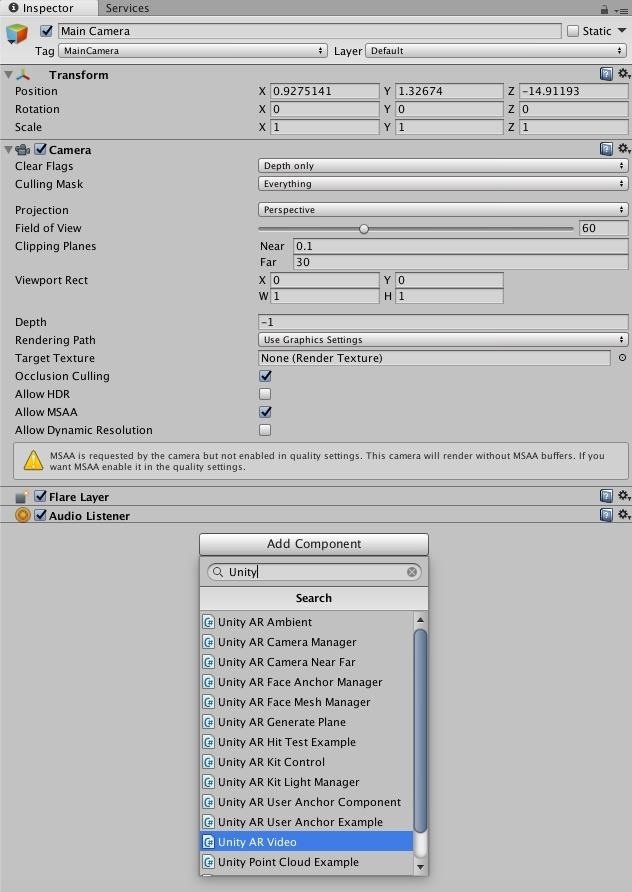
1. Add UnityARVideo
Without getting too low-level here, as terms like blitting and back buffer might scare people away, the first of the two classes, UnityARVideo, handles a bunch of under-the-hood rendering.
Click on the "Add Component" button in the Inspector, type Unity into the search box, find the "Unity AR Video" c# class (notice the c# icon), then click on it. It's worth noting that the search bar works as a filter, so you could also search for UnityARV, and you'd only get the classes that contain that combination of letters.
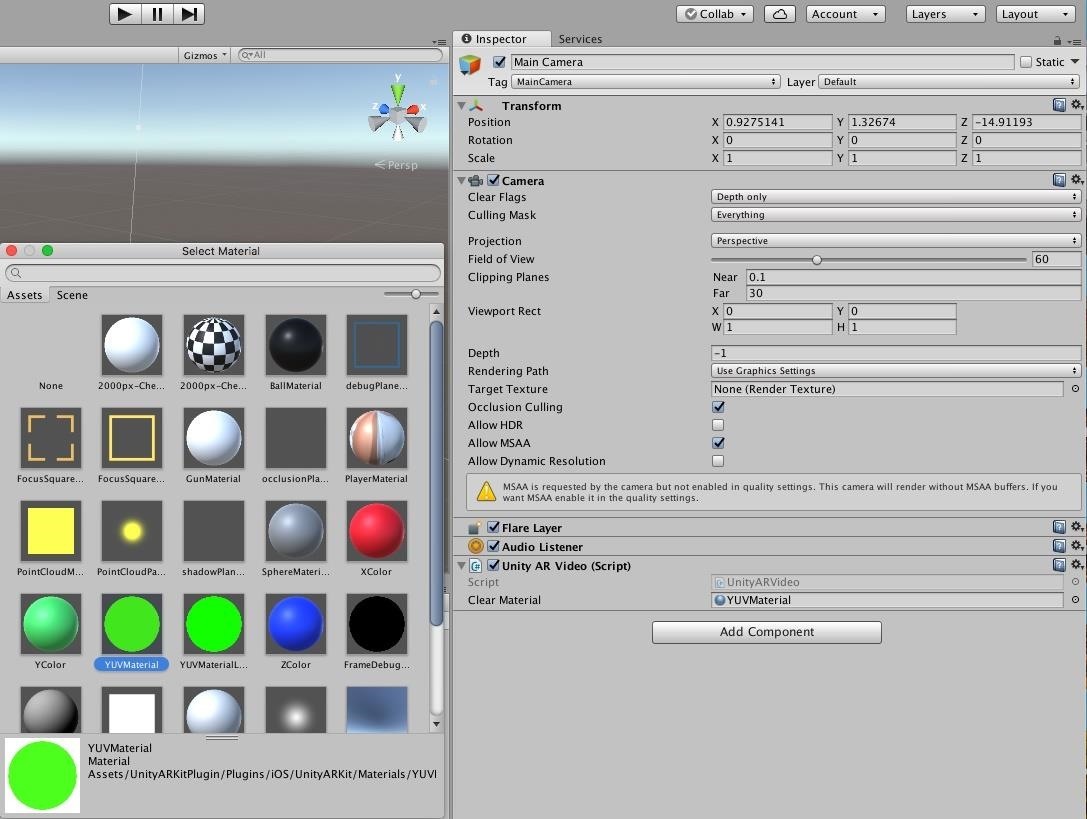
We need to add a material to this class for it to function, so in the newly added Unity AR Video component, click on the small donut next to the empty Clear Material field.
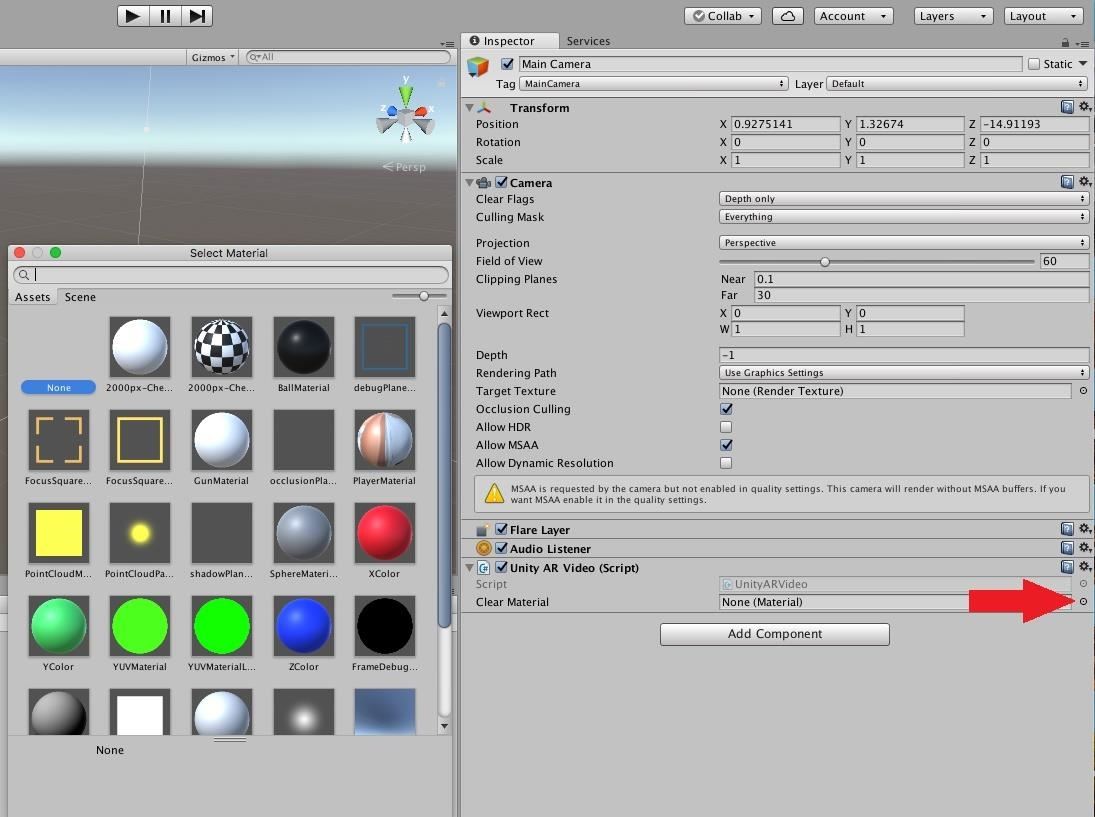
When the Select Material window opens, click on "YUVMaterial." In each frame, this shader is used to combine images into the background for the camera.
2. Add UnityARCameraNearFar
The second class, Unity AR Camera Near Far, acts as a relay of sorts between the camera and the ARSession, a class that handles the major processes of the ARKit. If the Near or Far clipping planes are changed for some reason, this class communicates these changes to the ARSession system.
Click on the "Add Component" button in the Inspector, then type Unity into the search bar. Find the "Unity AR Camera Near Far" class, and click on it.

Step 3: Create the Camera Manager
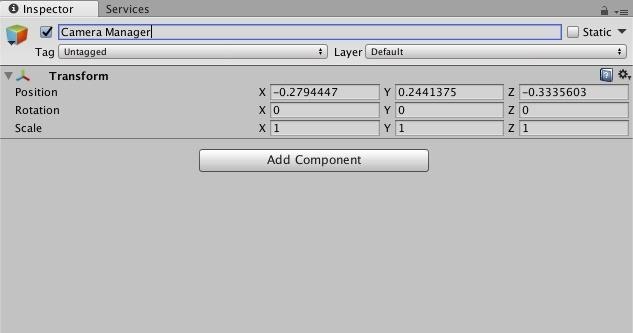
Just like in Step 1, in the Hierarchy window, create an empty object, this time naming it Camera Manager.
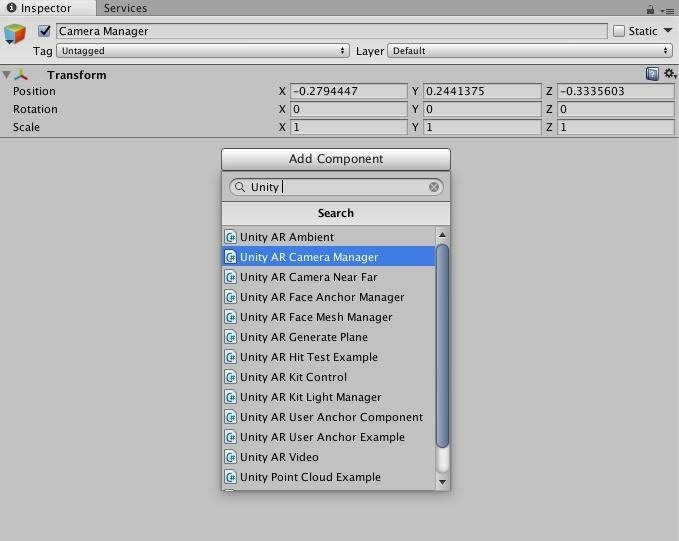
Next up, our Unity AR Camera Manager class gives us a number of options with which we can customize our application based on our specific needs. Alignment, plane detection orientation, point cloud data, and light estimation are all options that are changeable here. To add the UnityARCameraManager class, click on the "Add Component" button in the Inspector. Type Unity into the search bar and select "Unity AR Camera Manager."
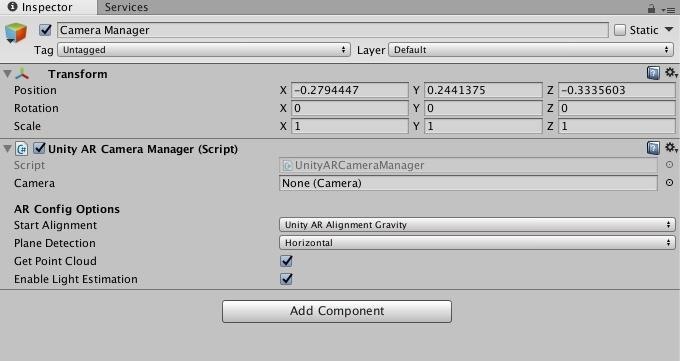
After you do this, the Unity AR Camera Manager class should appear. The default settings for this class are fine, with one exception: We need to link our camera to this class so it knows which camera to manage.
Note: In case that triggers a question in your mind, yes, a single application can contain multiple cameras. Some combinations of cameras are used to switch between for cutscenes, while other combinations are used for effects.
In the Hierarchy window, with "Camera Manager" selected, click and hold the "Main Camera" object. Notice that it does not highlight.
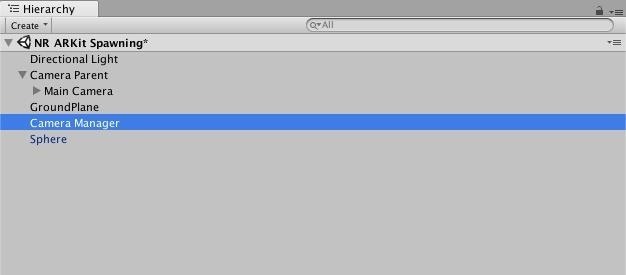
Drag the "Main Camera" to the empty "Camera" field in the Unity AR Camera Manager component of the Camera Manager object, and drop it.

Finally, the camera and all camera-related work is done. In my opinion, all of the work that has been done up to this point could easily be packaged into a camera prefab that came with the Unity ARKit plugin (it would be a timesaver). That said, I do make a personal habit of creating these types of prefabs for my own future use.
Step 4: Create a Spawn Point
One of the benefits of the hierarchy system utilized by Unity, which we touched on briefly in Step 1, creates a link between parent and child giving us a lot of flexibility in behaviors, especially in terms of complex structures.
In a hierarchy, a child can move without affecting the parent, while the movement of a parent object will move all of its children. There is a reason the analog of a hierarchy is often a tree. It just makes sense.
Imagine a tall old tree in the yard. If you tied a rope to one of the branches directly linked to the trunk and pulled on it, that branch and all of its children branches would move, but the trunk wouldn't. Now if you were to do the same to the trunk itself, all children move as a result.
In this step, we are going to create a spawn point and link it directly to the camera, as a child. This spawn point is a reference point for the system to know that we want a certain object, in our case, a sphere, to spawn here. Because the spawn point is linked to the camera's hierarchy, when the camera moves and rotates, so will the spawn point. As a result, the forward vector of the spawn point, or the direction we want to shoot our spheres, will always be tied the direction the camera is facing.
What this means in terms of functionality is that when we trigger our object to be spawned and apply velocity to it, it will always shoot forward from the user's viewpoint.
OK, lecture over, back to Unity. ...
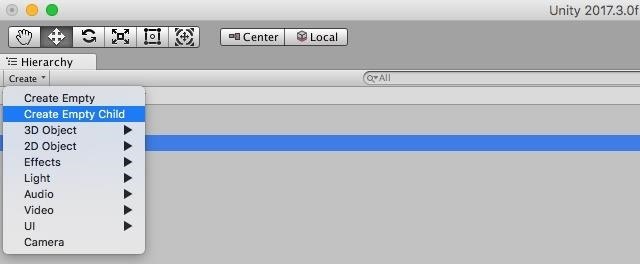
In the Hierachy window, click on the "Main Camera" object to select it.
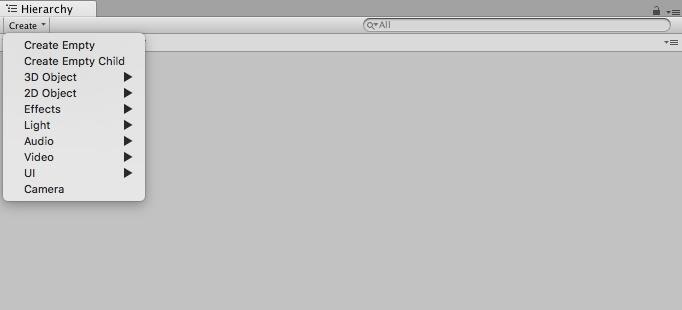
Just under the word Hierarchy, click on the "Create" button. Then, click the "Create Empty Child" option.
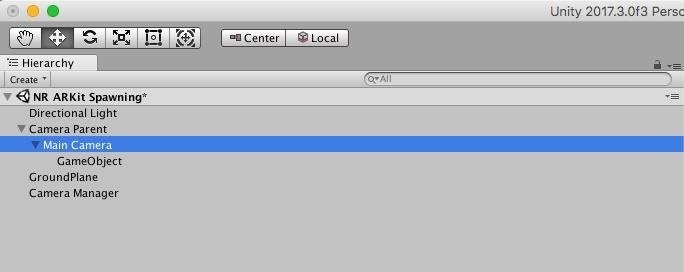
You'll then see a GameObject appear as a child of the selected object (in this case, our camera).
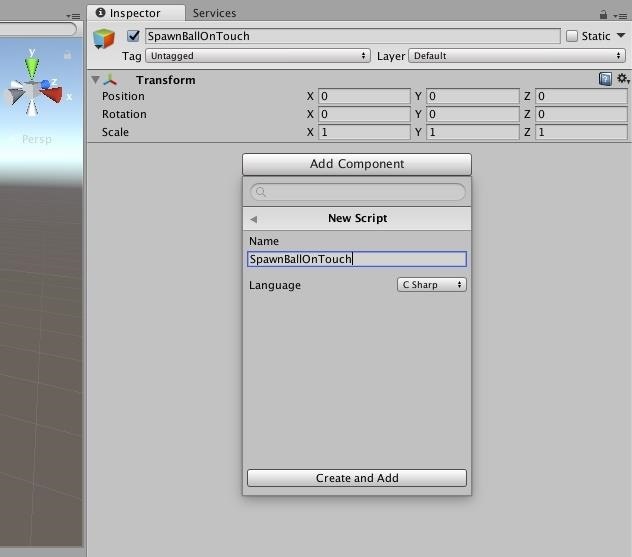
In the Inspector, name the new object SpawnBallOnTouch. Then, click the "Add Component" button, scroll down, and click the "New Script" option.
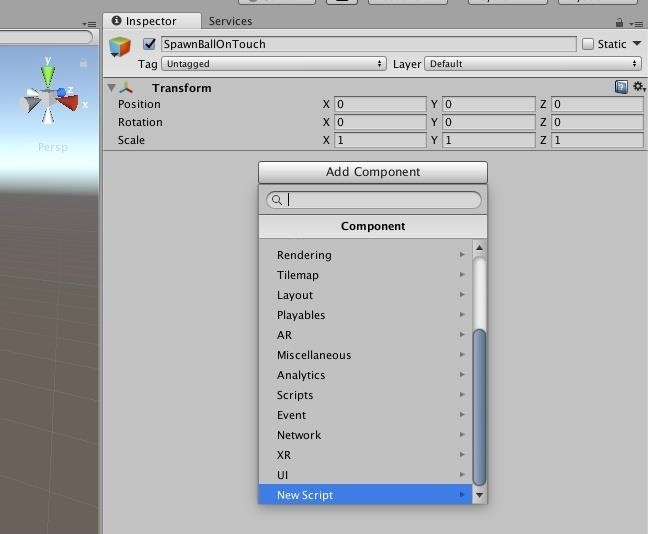
Name the new class SpawnBallOnTouch by typing the name into the field and clicking on the "Create and Add" button. You can, of course, name your classes whatever you like. Naming "SpawnBallOnTouch," for instance, "Death Star" instead will only affect how you understand what the class does. Of course, naming classes related to their function is the best way to remember what your aims were if you come back to a project after time away.
In the Project window, double-click on the newly created "SpawnBallOnTouch" class file to open the file in your code editor.
Step 5: Code the SpawnBallOnTouch Class
OK, so now we're going to do a little coding, but if you're new to this, don't worry. As this tutorial is not a coding class, we will go over what is happening, but we're not going to get into the deep dive stuff.
You can either type everything in yourself (which is always a good idea if you are trying to learn to code) or, if you have little-to-no interest in learning to write code, you can also just copy and paste the code into the file from this Pastebin page.
Got everything typed that you see above (or pasted from the link)? Good. Here's a quick overview of what everything is in there.
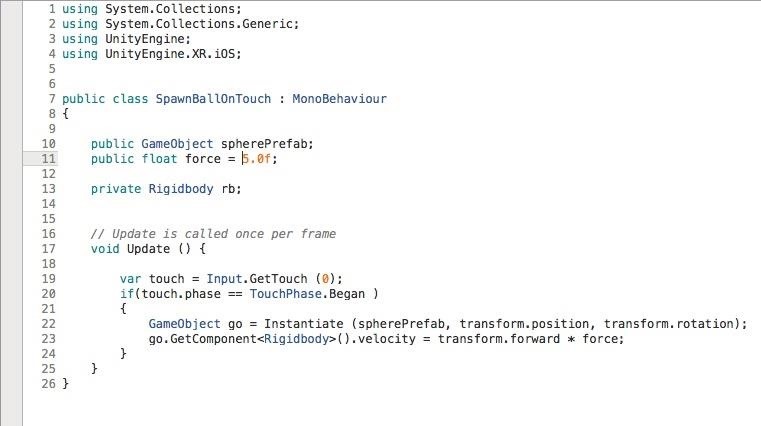
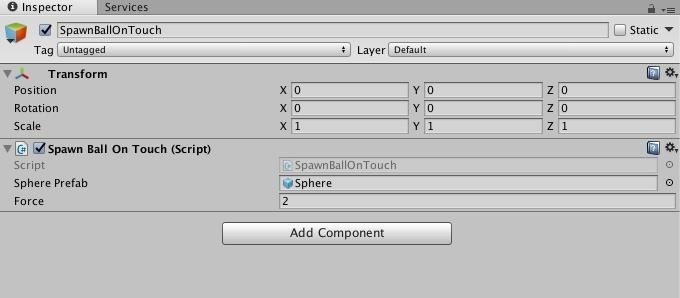
Starting at line 10 (as pictured above), we declare our properties:
public GameObject spherePrefab;
public float force = 5.0f;
private Rigidbody rb;
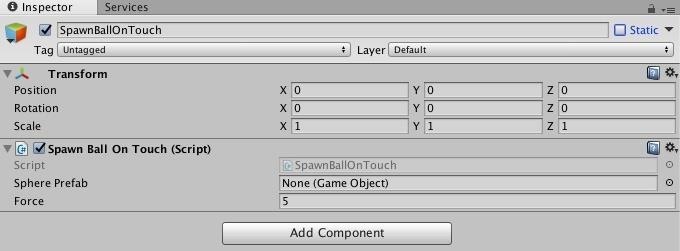
As you may have noticed, two of these properties are set as public and one is set to private. While in the C# language these keywords offer far more functionality, for our purposes, the distinction these keywords make in Unity is the difference between seeing an appropriate input field inside the Inspector window of the Unity editor, or not.
Just for clarity, when we are done, and this class is active on our object, this (see the picture below) is what our class will look like in the Inspector. The two public properties will be visible and editable, while the private property will be hidden.
Line 17 is the beginning of our Update method. This section of a Unity C# class runs every frame.
void Update () {
In line 19, we are creating a variable called "touch." Here, we are getting the results of the Input.GetTouch(0) method. This method will return a Touch data structure to be put into our touch variable.
var touch = Input.GetTouch (0);
In Line 20, we are using an if statement to test whether or not the phase property of the touch variable equals TouchPhase.Began. This is one of the possible results from the previous line of code. This will be true if the user has touched the screen, and false if they have not.
if(touch.phase == TouchPhase.Began )
Finally, lines 22 and 23 are what run when the answer to the if statement is true. First, we will create an instance of whatever prefab is tied to the spherePrefab in the Inspector, then we apply our force to the velocity along the forward vector of the newly created prefab.
GameObject go = Instantiate (spherePrefab, transform.position, transform.rotation);
go.GetComponent<Rigidbody>().velocity = transform.forward force;
OK, so after the code input is complete, and the file is saved, when you go back into Unity, give it a few seconds to compile the new code and you should see our class and new fields appear on the SpawnBallOnTouch object.

One problem with this in its current state is that the Sphere Prefab box does not have a Game Object in it. Whatever object we place here will be what spawns when we touch our screen. Let's fix that next.
Step 6: Create the Ball Prefab
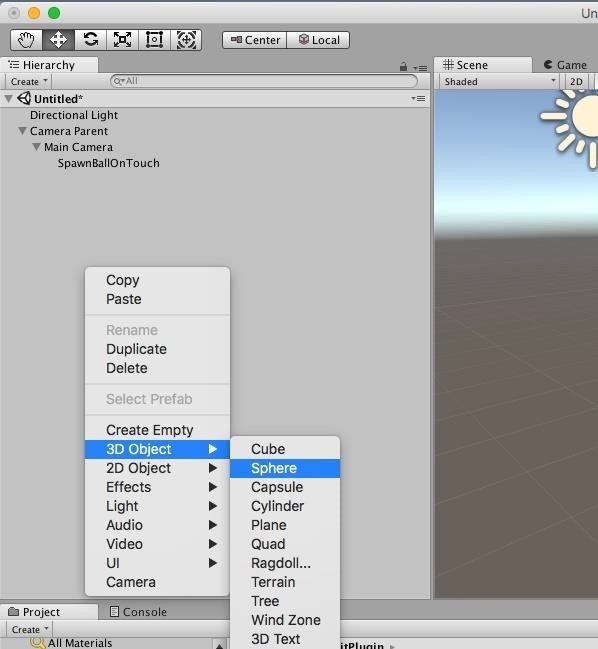
Now, we are going to create a prefab (an object template) that we can spawn every time a user taps the screen. Right-click in the Hierarchy window as we have done a few times before, then click on "3D Object," and select "Sphere."
Now, look over in the Inspector. Make sure its Position for X, Y, and Z are all set to zero. If, for some reason, the object was not centered, whenever you tapped the screen the object would not spawn in the center of the view, but instead off somewhere else in the virtual space.
Next, since the default size is way too big for our purposes, set the Scale for X, Y, and Z to a 0.1 setting. This number was arrived at based on trial and error. You can use completely different numbers if you like. Experiment and have fun.
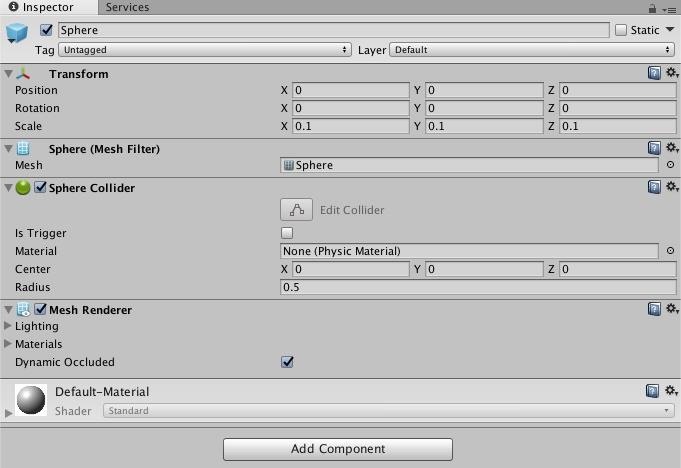
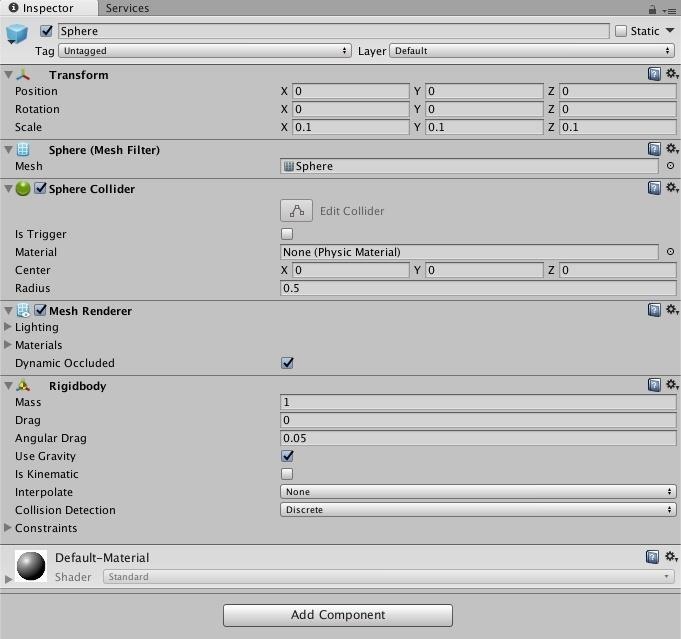
Next, we need to add a Rigidbody component to our object. Rigidbodies are the core of the Unity physics system. This will allow our object to interact with the ground plane that gets created as the user plays with this application, as well as gravity.
Click the "Add Component" button. Next, start typing Rigi into the search bar, and when you see "Rigidbody" as an option, click on it.

This is what it should look like once the Rigidbody is attached:
Now, in order to turn a GameObject into a prefab, select the "Sphere" object from the Hierarchy window, and drag it to the Project window and drop it.
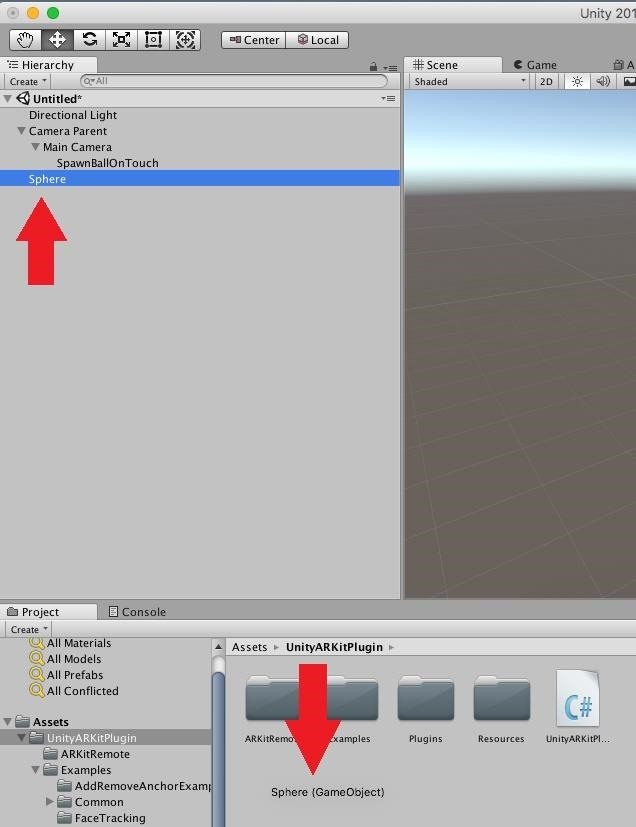
There you go, your prefab has been created. You should see the Sphere object appear similar to what is shown in picture below.
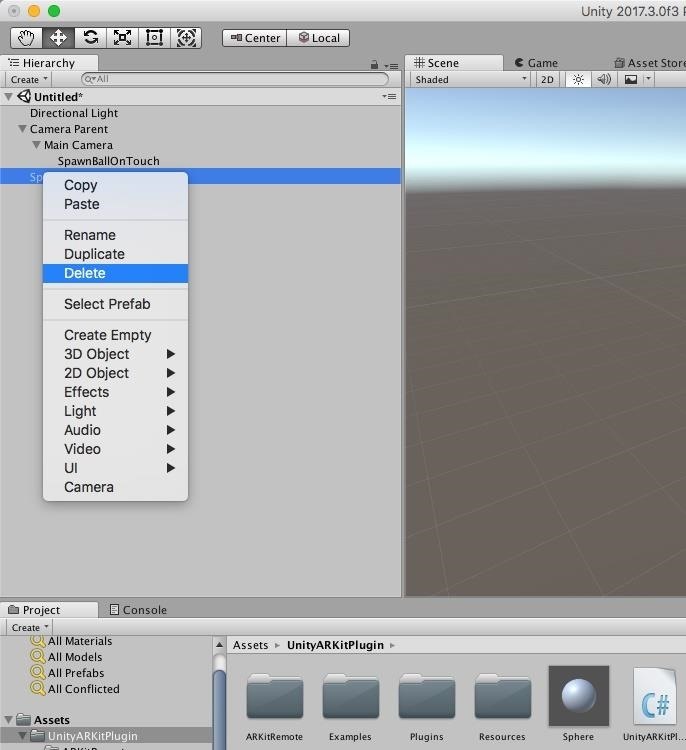
Since we now have our prefabs and no longer need the sphere in the scene, in the Hierarchy window, right-click on the "Sphere" object and click on "Delete."
Next, select "SpawnBallOnTouch" in the Hierarchy window, then click on the "Sphere" prefab we just created in the Project window. Just like we did in Step 5, drag the "Sphere" to the empty "Sphere Prefab" box in the Inspector and drop it.
Step 7: Create the Ground Plane Generator
One of the wonderful features of ARKit is its ability to see the space around us (at least on a basic level). This spatial recognition allows us, as developers, to make our digital objects interact with the world around the user.
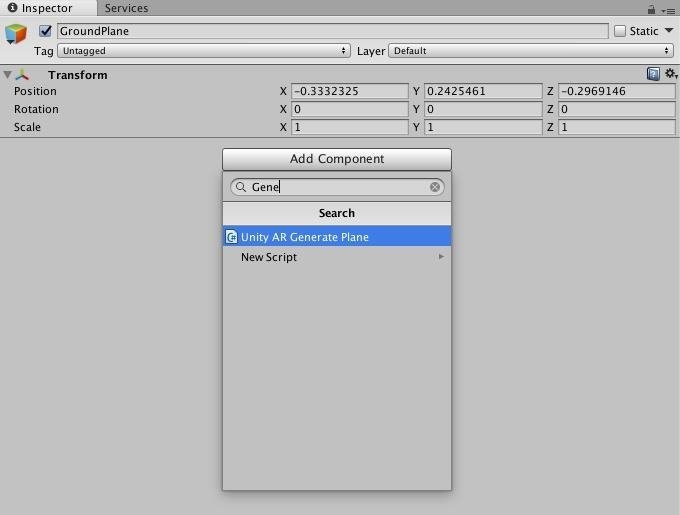
In this step, we will create the object that will be responsible for generating this surface information so our spheres can bounce and roll on the floor. Once again, in Unity, in the Hierarchy window, click on the "Create" button, then select "Create Empty." Name the new object GroundPlane.
Click the "Add Component" button, and type Gene into the search field. Select "Unity AR Generate Plane" when you see the option appear.
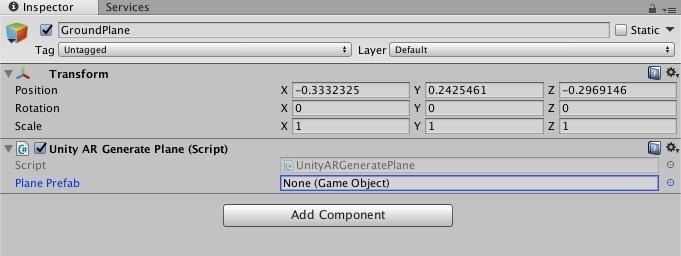
As you can see in the image below, the Unity AR Generate Plane class requires a prefab to work as the Plane.
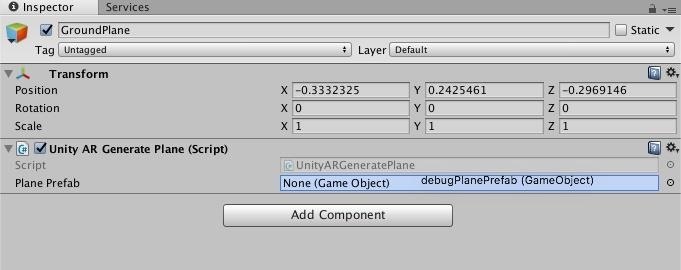
In the Project window, go into the Assets –> UnkitARKitPlugin –> Examples –> Common –> Prefabs folder.
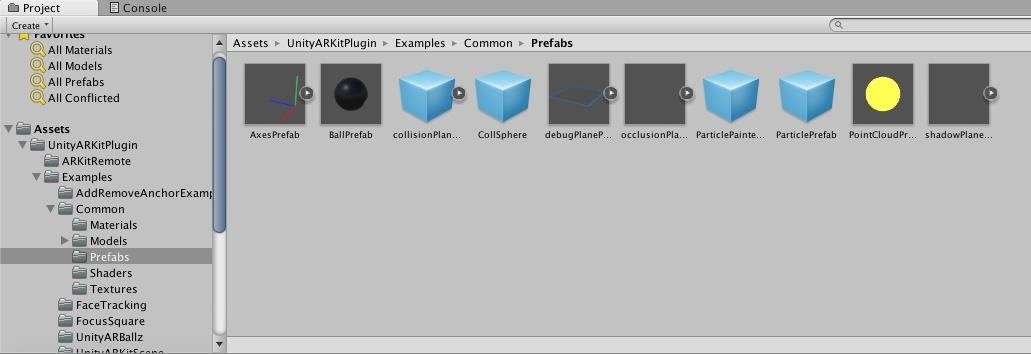
Then, click on the "debugPlanePrefab" object, and drag it to the "Plane Prefab" box on the GroundPlane object.
Next, for the same reasons mentioned in the previous step, check to see if the Position is at 0,0,0, as it needs to be. Click on the gear icon of the Transform component, and click on "Reset."

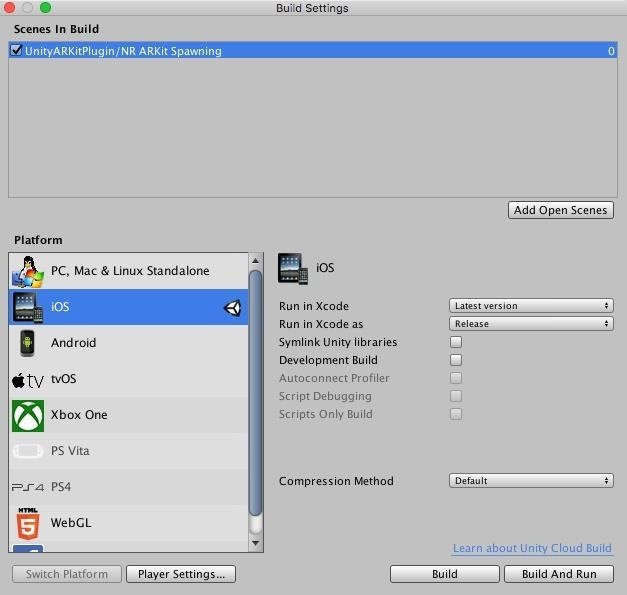
Finally, now that we have everything accomplished, on the main menu, select File –> Save Scene, then save the scene as NR ARKit Spawning.
Step 8: Build & Run It
Now we are nearly ready to see our work in action. Exciting! From the main menu, select File –> Build Settings to open the Build Settings window. Add the current scene to the Scenes In Build list by clicking on the "Add Open Scenes" button.
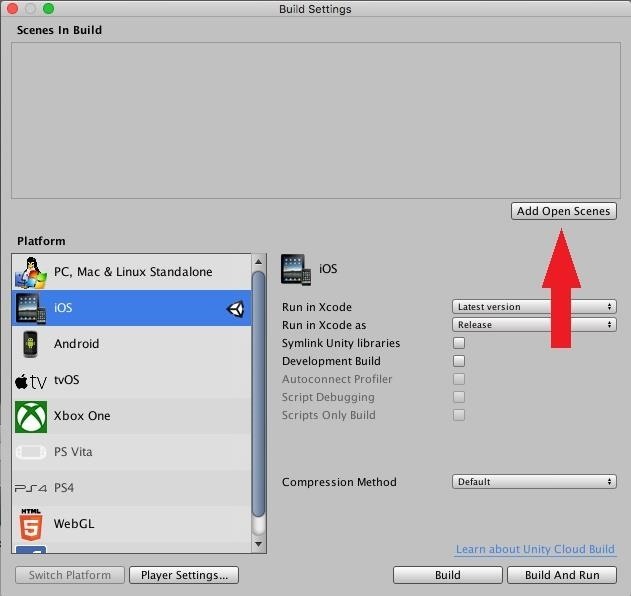
Now, click on the "Build" button. Confirm the build location when the window appears, click "Save," and Unity will do its job and export the app out so that you can open it and do the final compilation process in Xcode.
If you need a refresher on that part of the process, make sure and go to Step 6 in the guide on using the Unity ARKit plugin to create apps to see how to do that.
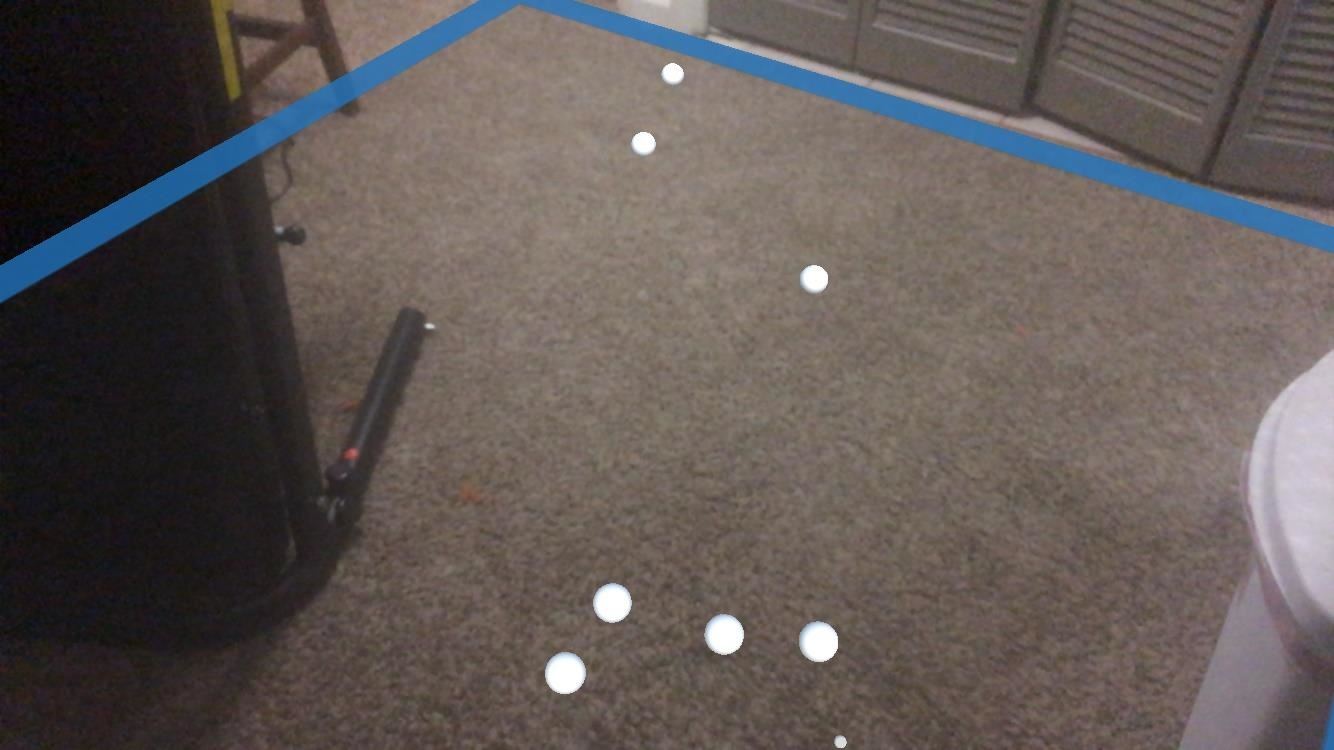
Regardless, once you have made it through the process, run the app on your device. At first, you will not see any ground plane appear, and all the spheres that spawn will fall to infinity. But after a few seconds, the ground prefab will begin to work, and the spheres will roll across the floor before they fall to infinity.
A Quick Recap
In this tutorial, we learned how to input the most basic ARKit interactions through the use of copies of objects known as prefabs and spawning instances with each touch of the screen. This tutorial also provided a look at several Unity-specific fundamentals and showed you how to build a barebones Unity ARKit project from scratch (instead of using premade templates). And we went over the basics for each component needed in the Unity ARKit plugin and ARKit ARSession system to function. We even touched on a bit of coding.
The next step would be to interact with the instantiated objects that are laying on the floor. But that would require a more accurate use of Input.GetTouch(). Stay tuned, as we may cover that in the future here at Next Reality. Happy hacking.
Just updated your iPhone? You'll find new emoji, enhanced security, podcast transcripts, Apple Cash virtual numbers, and other useful features. There are even new additions hidden within Safari. Find out what's new and changed on your iPhone with the iOS 17.4 update.


Be the First to Comment
Share Your Thoughts